INTRO TO DREAMWEAVER
Dreamweaver is a WYSIWYG HTML web site development tool. It is a reasonably intuitive program and you will be most successful if you understand some basic HTML code.
For any web site to be easy to navigate, and to make use of Dreamweaver's site organization features, it is mandatory that you have a detailed plan before you begin.
This process includes:
- navigation map: a list of the pages involved and the content for each
- navigation system: buttons or other method(s) to link from one page to the next
- page template(s)
- site folder located on your hard drive, or removable media
- folders within the site folder that will contain media, images, HTML files, and
- any other materials you will be using on your site (i.e. movies, animations,
- sounds, downloadable items (PDFs) etc.)
Only when you have established your plan and have created and/or collected the most of the various parts, called assets, should you begin building your site.
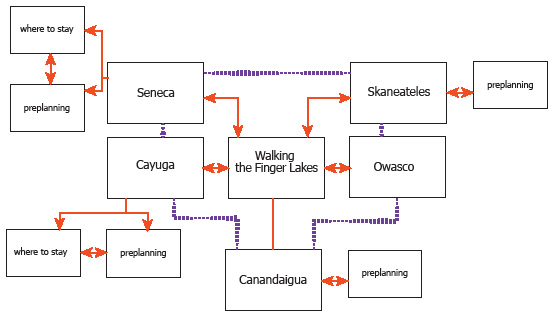
Determine the main topic, and then the secondary topics. Each of these may have other levels of information. Write notes within each "page" in your site plan indicating the content, and the assets you'll need to collect. The red arrows in this diagram represent main menu links. The purple lines represent links from one lake to another, so the user doesn't have to go through the home page to move around.
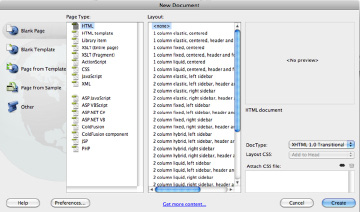
When you choose "new" in Dreamweaver, you get a panel that lets you define the kind of file you want to create.
Dreamweaver's workspace is a bit different from others in the Adobe CS since it deals with code, as well as a "what you see is what you get" (WYSIWYG) design area. The commonalities consist of a work area (or artboard) an options bar (called the Properties panel in this case) and panels that help you specify the content and arrangement of page elements. The one significant difference is the ability to work in "artwork" mode, or in code mode, or both simultaneously.
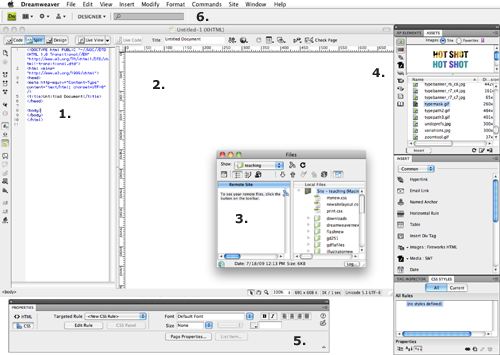
Use the Code, Split, or Design views to customize your workspace. 1) CODE AREA: you can display this horizontally across the top, or as pictured here, vertically along the side of the design area. 2) DESIGN AREA: this is where you will type, paste, and import images and media in a WISIWIG format. 3) The Files Panel is used to organized your site locally (on your hard drive) and to upload files to your remote site (server). 4) PANELS: open those you need from the Window menu. Those that are most important include ASSETS, INSERT, CSS STYLES and the FILES panels. 5) PROPERTIES PANEL: use the options here to tweak HTML code for content, and CSS rules for styling. 6) APPLICATION BAR: use the workspace popup menu to rearrange the panels.
Along the top of the document are other options that you may find valuable as well.

1. View: choose whether to work strictly in code, or code and design, or strictly design view. These buttons make it easy to switch back and forth, depending on what you are working on.
2. Live View: selecting this previews the HTML page as it might be seen in a browser. While you can preview your work in any specified browser, this option keeps you within the Dreamweaver work space. You cannot make any changes to your design while previewing it in Live View.

3. Title: always title your pages with something descriptive so people who search for, or bookmark your site, know what it's about. The title of a page has nothing to do with the name of the HTML file.
4. Get|Put: choose to retrieve files from a remote site, or upload the current file to the remote site.
5. Preview: set up a primary and a secondary browser using Dreamweaver >Preferences > Preview in Browser. I recommend setting up keystroke shortcuts for this to save oodles of time.
6. Refresh: whenever you make changes to the code, you need to refresh the design. It's actually faster to just click in the design half of the workspace than to click this icon.
7. View Options: this is a shortcut to turning on and off things that can enhance the design process.
8. Visual Aids: another list of items that you can turn on and off. Turning them all off gives you a better approximation of what the page will look like, but not as accurate as Live View, or Preview.
9. Validate: this is very important. Pages that cannot be validated are harder for search engines to find, may not be cross-platform compatible, and generally, bad practice. See http://validator.w3.org/ for more information
10. Check Page: this opens a panel where you can check for broken links, including images and media, as well as URLs. Very handy!
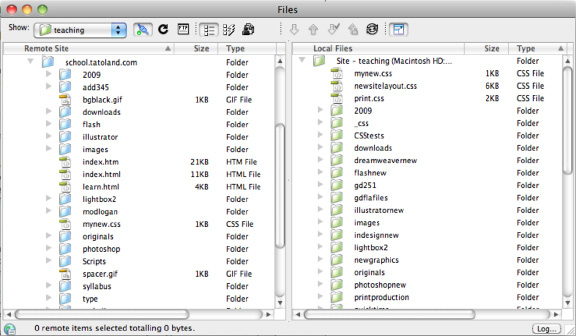
The Files panel is the control center of any site you work on. The right side contains the contents of the root folder, and the left displays the files that have been uploaded to the remote server—your domain.
Open the Files pane (Window > Files, or Command Shift F ) and click the icon at the top right to see both the local and remote views. It looks like two pieces of paper with a diagonal arrow. Connect to the server by clicking on the icon that looks like a plug next to your site name at the left.
PANELS
There are several panels that I find I use more than others. Every designer will find some more useful than others, and you should poke around to see if there are any that you find particularly valuable. These are the ones I can't live without.
Files: You can choose to view your local root site, the remote site, or both, side by side. Click the funky page icon at the top right of this panel to split the view. This panel is used to track and organize all the files associated with your site.
Think of the two sides (left is remote, right is local) as parallel universes. If there is an HTML file in a folder called "photoshop" on the right, then that file must be located in a folder called "photoshop" on the left. If a file is "loose" in the root folder (like the index.html file must be), then it needs to be "loose" on the remote site as well.
Use the Show popup menu at the left to create and edit sites, and to select the site you want to work on. More on that to come.
CSS: HTML defines the content of a web page. CSS rules specify how that content looks and where it is positioned on a page. You must create CSS rules to design a page properly, and you can save them inside the document in which you are working, or in an external CSS file that you can then link to all the pages in your site. Very handy for ensuring that all the pages look like they came from the same place. See the section on CSS for more details.
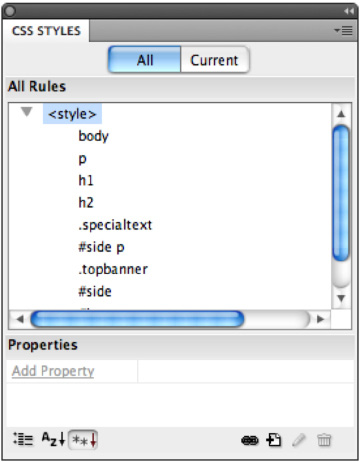
CSS, which stands for Cascading Style Sheets, is the code you create to define the layout of a web page.
Insert: you can use the Insert menu for these items, but clicking on them in this intuitive panel is a lot faster. There are several options for what you want to, available from the popup menu. Typically, you will be using the Common menu most often to place images and media, and for inserting <DIV> tags.
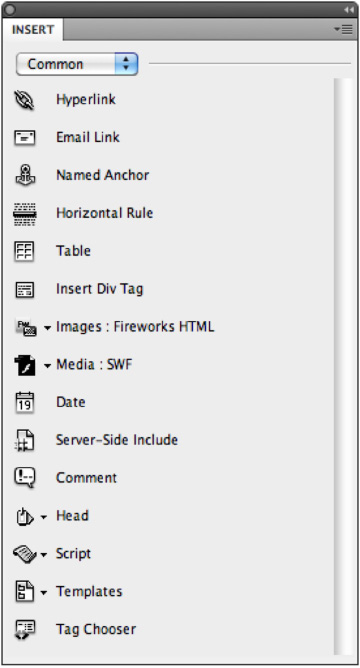
Use the Insert panel to add objects to an HTML file, from links to images, to video or Flash.
Assets: I don't use this one too often, but it is valuable. Depending on the category you select along the left side, this panel will show you all the documents/files of that type currently in your local root folder. Note that these may not be anything you have used in an HTML document, just files that are in the root folder. Click and drag an image, for instance, to place it in the current open file. If you find there is a particular item you use a lot, you can assign it as a favorite to make it easier to locate when needed.
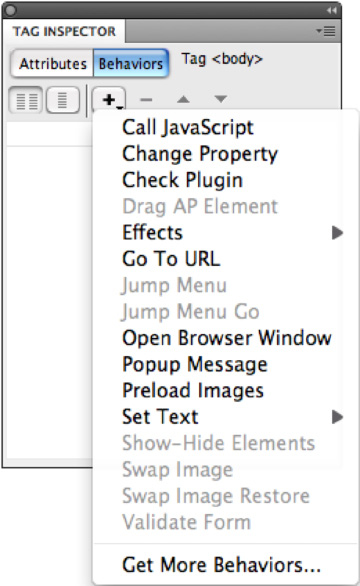
The Tag Inspector is used to edit or add attributes—changeable properties or characteristics—and to add javascript behaviors.
Tag Inspector > Behviors: essentially, this adds code to a file to establish what happens when a user interacts with a button, and there are some nice options here that you should take the time to explore. There is more detail about a few of them later in this document.
DEFINING A SITE
When creating a site for the first time in Dreamweaver, there are two very important steps you need to take: defining the site, and creating the index.html (or in some cases, default.html) file.
First, create a folder on your hard drive where you are going to save all the files for this class. This will be referred to as the root folder and you can call it anything you want. This is where everything you create for your site should be stored. Create subfolders as needed to stay organized! These steps are for CS4. Instructions for CS5 follow.
1. Launch Dreamweaver.
2. Go to Site > Manage Sites.
3. Create a new site (if you don't have one already defined).
4. Click the Advanced tab at the top of the site definition window.
The next series of dialog boxes require you to type in the information that allows Dreamweaver to display your site files, connect to a server, and update links (very important!!) when you make changes.
The following images illustrate what you should type in each area‚ panels not included here are ones you can safely ignore for now.
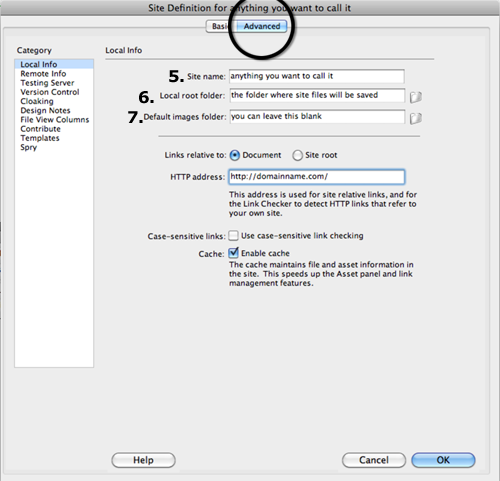
LOCAL INFO
5. Site name: you can call this anything you want; it's the name Dreamweaver will display in the Files pane.
6. Local root folder: click the folder icon to create or browse to, and select, the folder in which you're going to save all your site files (assets). This should be located on your hard drive or removable media.
7. Default images folder: if you want to keep all the images you create in a single folder, you can specify that here. I recommend against that as it can get confusing, especially when developing anything interactive (i.e. buttons, or rollovers) in Fireworks.
HTTP address: type in the absolute URL for your site here.
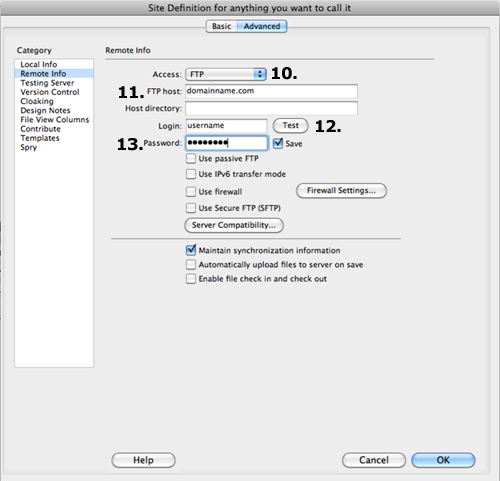
REMOTE INFO
You will have to have a domain and web hosting before you can set up the remote information.
You will need your domain name, user name and password information handy.
Click on the Remote Info category
10. ACCESS: select FTP (check with your service provider to make sure of the access type if this doesn't work. If you are using mysite at SU, the access type is WebDAV).
11. FTP host: this is the domain name you purchased (i.e. tatoland.com). Note that you may not need the http:// before the domain. If you are using the SU server, your URL is https://username.mysite.syr.edu/admin (note the S after http!)
12. LOGIN: your username
13. Password: your password; either the one you used when you set up your domain hosting, or your SU netID.
UNCHECK maintain synchronization information for now.
Click the "test" button. You should get a message that Dreamweaver was able to connect to your server successfully. If you don't, double-check all the information, and make sure you have an internet connection.
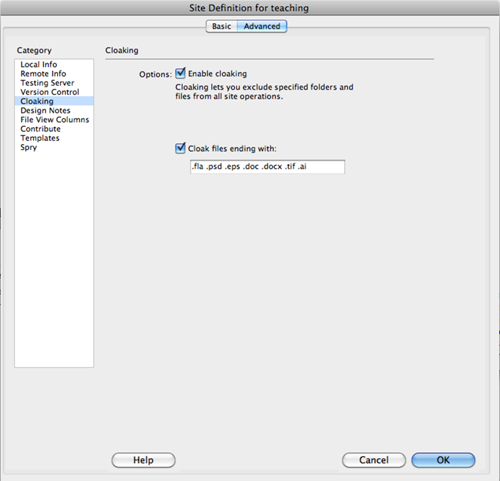
Click on the Cloaking category, then check the "enable cloaking" checkbox. This will prevent files that don't belong on the server from being transferred by mistake. You can add file extensions here for any document types that do not belong on the remote server, including PSD, AI, DOC or DOCX, and so on.
Click OK, then click DONE.
NOTE: If you work on different computers, you will need to define your site on each one as it's the local copy of Dreamweaver that tracks the root folder.
SETTING UP A SITE IN CS5
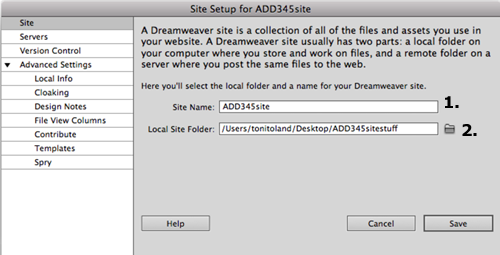
Use Site > New Site to open the site definition panel.
1. Give your site a working title; this can be anything you want.
2. Click the folder icon and browse for the root folder you created on your hard drive.
Select the Servers option at the left.
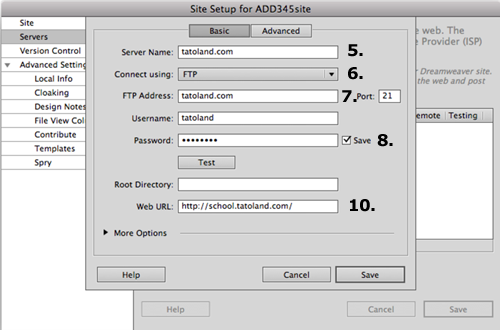
Click the + sign at the bottom, and then type your server name in the first field (5.).
6. Choose FTP to connect unless your service provider has indicated a different protocol. If you are using the SU server, select WebDAV instead.
7. Add the FTP address to your site. This may or may not be the same as the Server Name. If you are using the SU server, the FTP address will be https://username.mysite.syr.edu/admin. (Replace "username" with your username.) Note the S after http, and the "admin" after the server name.
8. Type in your netID and password.
9. Click the Test button to make sure you can connect to your remote host.
The Root Directory field is where you would add the folder name on your remote site where your files will go. Check with your service provider if you're not sure whether that's required or not.
10. Type in the URL for your site. If you are using the SU server, the URL will be http://username.mysite.syr.edu. Note there is no S after http, and no "admin" after the server name.
Click the triangle next to Advanced Settings and then choose the Cloaking category.
Check the Enable Cloaking option. Add any other extensions that you want to keep from transferring to the remote site, like AI, INDD, DOC or DOCX and so on.
Click Save, and then Done.
The next step is to create the index.html file—the document that a web browser will display automatically when someone types in your URL. It is the "home" page, or "first" page of any site, and it must be named either index.html, or sometimes default.html. If you call it anything else, it will not be the first page in your site.
YOUR FIRST PAGE
All sites have an index.html or default.html file.
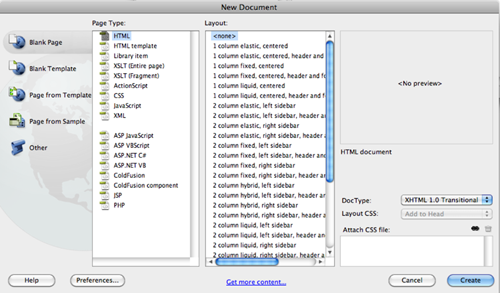
Create a new document (Command N). Select Blank Page, then HTML for Page Type and <none> for layout.
This index.html file should be saved in your root folder, but not inside any subfolders. The file name (index.html) has nothing to do with the title of your web page. Do NOT use the file name as the title for the page. They are two different things.
Create a new HTML file using File > New.
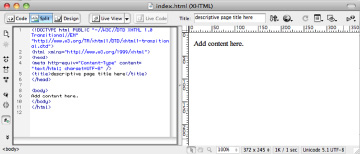
Click the Split option so you can see the code as well as the design area. If you want it side by side, as above, use View > Split Vertically.
In the New Document dialog box, select Blank Page. Choose HTML for Page Type, and <none> for Layout. At the bottom right of this panel, make sure DocType is set to XHTML 1.0 Transitional. This is the standard for current web sites.
Click Create.
Once you are in the Dreamweaver interface, there is an awful lot to look at! Before getting too distracted, though;
Click the Split View option at the top left of the document window.
In the center at the top of the document, you will see a Title field.

Type a descriptive page title in the Title field at the top of the document window.
Enter a very descriptive name for your HTML page. It can have spaces and capital letters, punctuation, and so on. This is the text that a browser will display at the top of the page, and what people will see when they bookmark your site.
Then, type something in the content area (design pane). It doesn't matter what you type at this point, since this page will change, once you get into actually designing and composing things.
Save the file using File > Save (Command S) and name it index. Do not use any capital letters. Do not try to get creative and call it "home" or "myfirstpage." It must be called index. Dreamweaver will add the HTML extension automatically.
Navigate to the folder you are using as the root folder for your site, and press Save. Do not put this file in a subfolder. Leave it "loose" in the root folder.
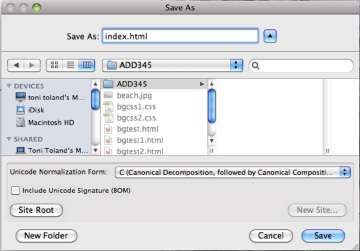
Save the file in your root folder—don't place it in a subfolder. Name it index (no caps). Dreamweaver will automatically add the HTML extension for you.
UPLOADING THE INDEX PAGE
Click the plug icon next to the site name at the top left of the Files pane to connect to your remote server.
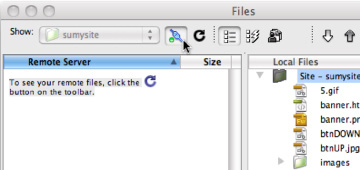
Connect to your remote server by clicking on the plug icon in the Files pane.
You'll then be connected to your server, and may see a list of folders and/or files, if there are any, or just a root folder icon. This is called the remote site, or remote server.
This is the folder where all the required files will go once your site is fully developed.
To move files, simply click and drag them from the right pane to the left pane.
Click and drag the "index.html" file over to the server. Drag it on top of the root folder, and make sure you see a green circle with a + in it before letting go of the mouse button. Dreamweaver will ask you if you want to move any dependent files—images, animations, and so on, that may be part of your index page. Click "yes" even if you're dragging everything over manually.
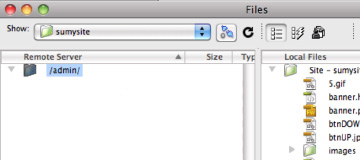
Drag the index.html file on top of the remote folder. When Dreamweaver asks if you want to include dependent files, click yes.
Then open a browser and type in your URL. Nice!
What's your URL? It depends on where your remote site is located. If you are using the SU server, then your URL is:
http://yournetid.mysite.syr.edu/
If you have purchased your own domain, then the URL will be:
http://yourdomainname.com/
YOUR TURN
Following the steps on the previous pages, create a home page that will act as the portal to your projects this semester.
Don't confuse this with the index page you'll be developing for the main project!
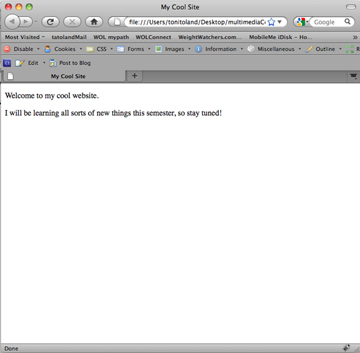
All you need to do is type something into the Design View area, add a page title, and save the file as index.html. Then upload it to your webspace.
Share the URL by adding it to this week's discussion area.
