INTRO TO FLASH
The "Classic" workspace is a good place to start when you're just beginning to navigate the Flash environment, although you will no doubt end up customizing the way various panels are arranged and docked. Use the Workspace menu at the top right. You can save your customized workspaces using the workspace options dropdown menu.
As with previous Adobe CS software, the panels that you'll be using in Flash are now all docked at the right side of your screen. You can drag these away from the doc as a group—several items tabbed together—or as individual panels. You can redock them or work with them as floating panels. Reorganize groups by moving them using the title bar (for a group), or the tab (for a single panel). The images in the lectures for this course are all Mac screenshots using the Classic workspace, with a couple of floating panels.
Spend some time opening panels using the Window menu, reorganizing them, separating and redocking them, and collapsing and expanding them, to get a feel for your workspace options. You can get back to the original workspace easily using the dropdown menu in the Application bar and selecting "Reset Classic."
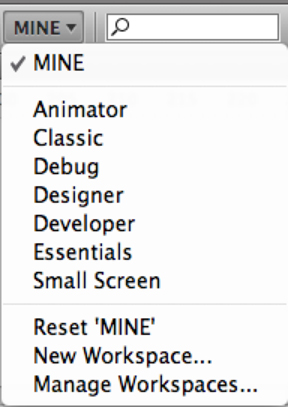
Select from a number of preset workspaces, and save custom arrangements; revert back to any workspace with the Reset feature, towards the bottom.
To create a new document, you can use the keystroke shortcut that works in just about every program out there, Command N / Ctrl N, or select Create New Flash File from the Welcome screen. In either case, remember to select the ActionScript version you want to use. If you find that you cannot use the Actions panel to place code on a selected element on the stage, you may have inadvertently selected ActionScript3; use File > Publish Settings > Flash tab to set it back to ActionScript2. Or, if your ActionScript3 code isn't working and you're getting a lot of errors, then you may be working in an ActionScript2 file.
I will be providing both ActionScript2 and ActionScript3 versions for how to do everything—you can decide which you want to go with. Just remember that you cannot mix and match within a project. You will have to stick with your decision, or start all over again, should you change your mind. Then again, it would be to your benefit to do everything in both AS versions ;-)
My feeling is that it's easier to learn AS2, and once you have that down, moving to AS3 is a snap. But that's just me. Ultimately, you will want to learn AS3—especially if you are into code and want to pursue that in your career.
Flash CS4 and CS5 are better integrated with the other Adobe programs, like Illustrator and Photoshop, and all the Adobe Suite products now share a common interface.
When you open Flash for the first time, and if you've been working with any previous versions of Adobe Software, you'll notice a new bar across the top of the interface, just under the menu bar. This Application bar allows you to set custom workspaces, and search the Help files with more ease. In time, it may also include the ability to see multiple projects in tiled fashion, and provide connectivity to Bridge for a more efficient workflow.
Flash is a vector-based program, and it has two different drawing modes; one behaves a bit like Photoshop, and the other, like Illustrator. The drawing tools are also a combination of these two different drawing and painting approaches, including freeform tools like the paintbrush and pencil, along with the more precise shape and pen tools.
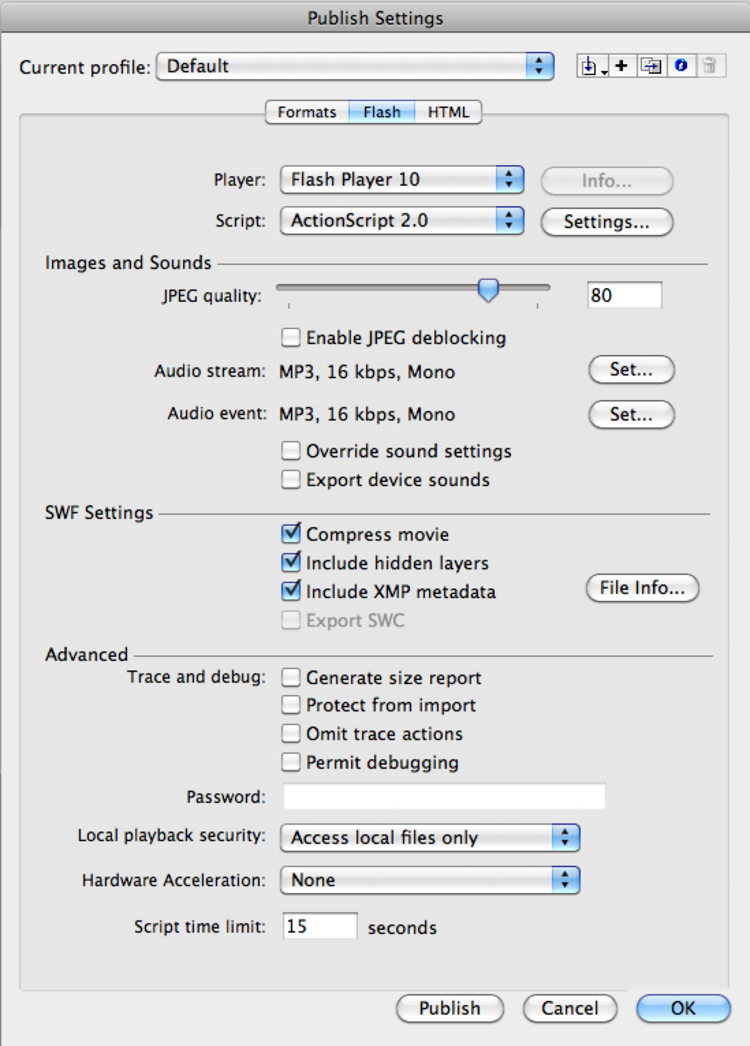
If you find you can't do certain things, double-check which version of ActionScript your file is set up to use by selecting File > Publish Settings.
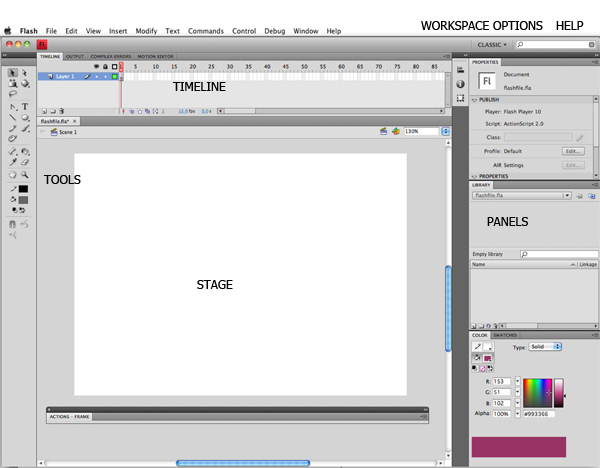
TOOLS
Certain drawing tools have drawing options attached to them. You see these at the bottom of the tool palette when you select a drawing tool. In this illustration, the magnet button allows you to "snap to" other objects on the stage.
From the top:
 Selection tool (solid arrow): Use this tool to select things, move them, and edit shapes and lines. Double-click the fill of an object to select all of it.
Subselection tool (hollow arrow): This works like the hollow arrow in Illustrator. Click on a line or shape to edit its control points.
Scale tool: Select an object with this tool to adjust size and angle. Hold the Command / Ctrl key to modify a single control point.
Gradient tool: Once something is filled with a gradient, click on it with this tool to rotate the gradient, and adjust its length.
3D tools: These are only available to use in ActionScript3 files. They do not create 3D shapes, but rather, distort objects in 3D space (i.e. perspective).
Lasso tool: select freeform shapes by clicking and dragging around an area.
Pen tools: Click to create corner points, and click and drag to create curve points. This tool works pretty much like the one in Illustrator. Click and hold to access the add point tool, the delete point tool, and the convert point tool.
Text tool: Click and type, or click and drag to establish a bounding box. There are three kinds of type in Flash: Static, Dynamic, and Input. Use static text: select it in the properties palette.
Line tool: click and drag to create straight line segments in any direction; use the Shift key to constrain a line to horizontal, vertical or 45 degrees. Lines that touch can be treated as a single element.
Rectangle tool, Ellipse & PolyStar tools: Click and drag to create a rectangles, circles, or star/polygon shapes. Use the Properties panel to add rounded corners to a rectangle. Use the "options" button on the Properties panel to specify the number of points to a star, or sides to a polygon.
Rectangle and Oval Primative tools (grouped with the shape tools): these create grouped shapes that can be manipulated by changing the settings in the Properties panel.
Pencil tool: select a line/edge color to draw with this. its options are to draw straight lines, curved lines, and "ink" lines (which remain as you drew them).
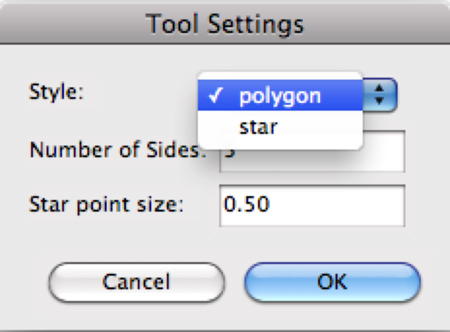
Use the Tool Settings Options in the Properties pane to determine whether to draw a polygon or star. A three-sided polygon is a great way to create triangles.
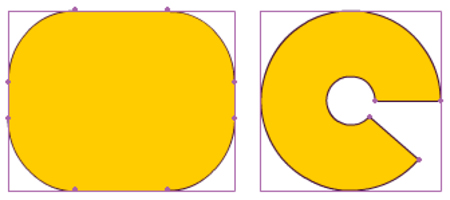
The Primative tools can be manipulated in several ways using Properties pane options.
Paintbrush tool: Select the fill color you want when using this tool. Its options include normal, fills, behind, selection, and inside. You also get a dropdown menu for selecting brush size and another for brush shape.
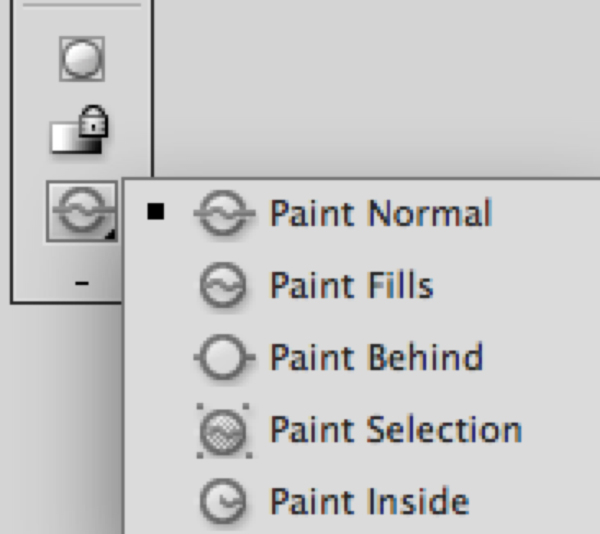
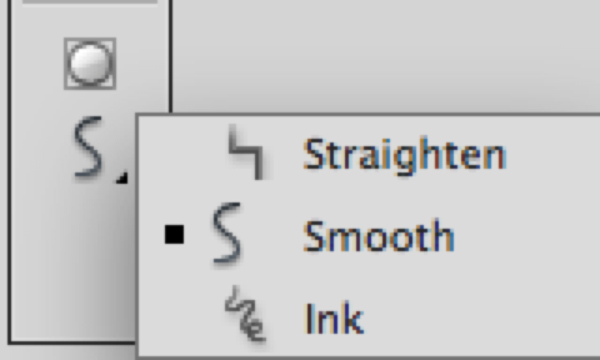
Check the options at the bottom of the Toolbar for the pencil and brush tools to get the effect you want.
Spray Brush tool (behind the Paintbrush) : Use this to spray a pattern of shapes. Create the shape and then turn it into a movie clip symbol, then use the Properties panel to specify that symbol to use with this tool.

Use the Spray Brush to spray symbols around the stage (a lot like the Symbol Sprayer in Illustrator).

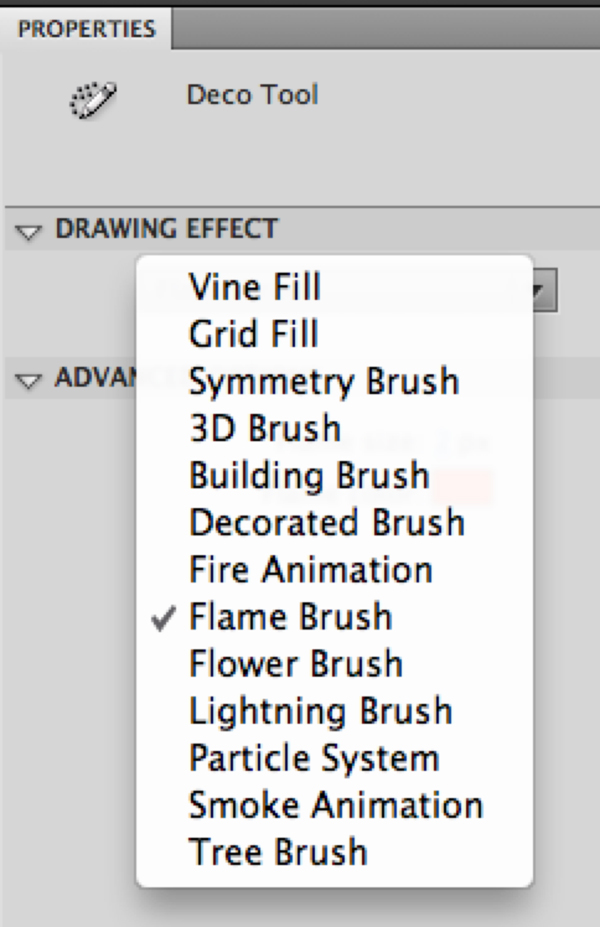
The Deco tools sprays symbols too, as well as creates animations. The choices are more limited in CS4. Use with extreme caution!
Deco tool: this sprays vines, symmetrical shapes, and a host of other things in CS5. Be careful as the results can be "cool" for about 12 seconds, and that's all.
Bones tool (or IK tool): this is only an option for AS3 files. See the tutorial for how it works. Pretty amazing!
Paintbucket tool: Select a fill color and click within a shape to change its color. You have some options about whether this will fill shapes that are not quite closed, mostly closed, or not to fill open shapes—check the bottom of the toolbar for these options.
Ink Bottle (behind the Paint Bucket): Select a stroke color and use this tool to add or change the stroke around a shape. Click right on the edge of a shape to make it take effect
Eyedropper tool: Use this to pick up a color used elsewhere in your document. As soon as you click, the eyedropper turns into the paintbucket or inkbottle so you can apply the color/stroke to another object.
Eraser tool: Use this to erase lines or fills; select its size and shape from the option portion of the Toolbar. You can erase normally, just fills, just lines, selected fills, or just inside an object. The faucet icon completely erases anything you click on.
View tools: The hand guy scrolls around your stage (use the Spacebar shortcut). The magnifying glass zooms your view closer or further away (use the space and Command keys, or space, Command, and option keys shortcuts, or Command + and Command -).
Colors: The pencil icon selects edge/stroke colors from a popup swatch panel. The bucket selects fill colors. You can also type in a specific hex color and set the transparency here.
The button under the two color selections (from left to right) reset colors to black and white, and reverses colors.
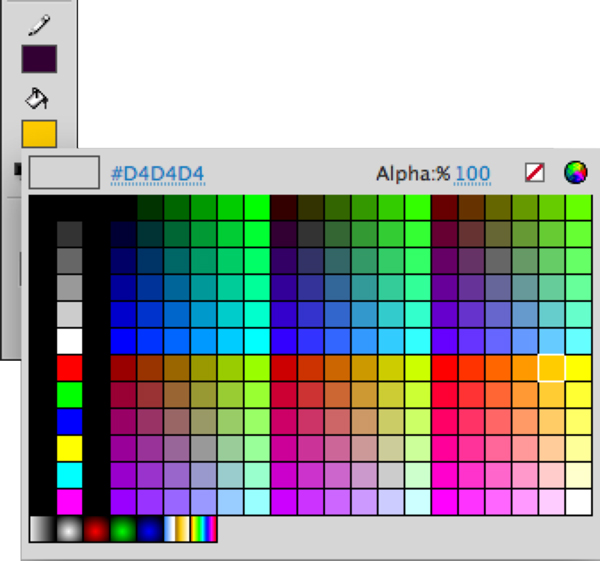
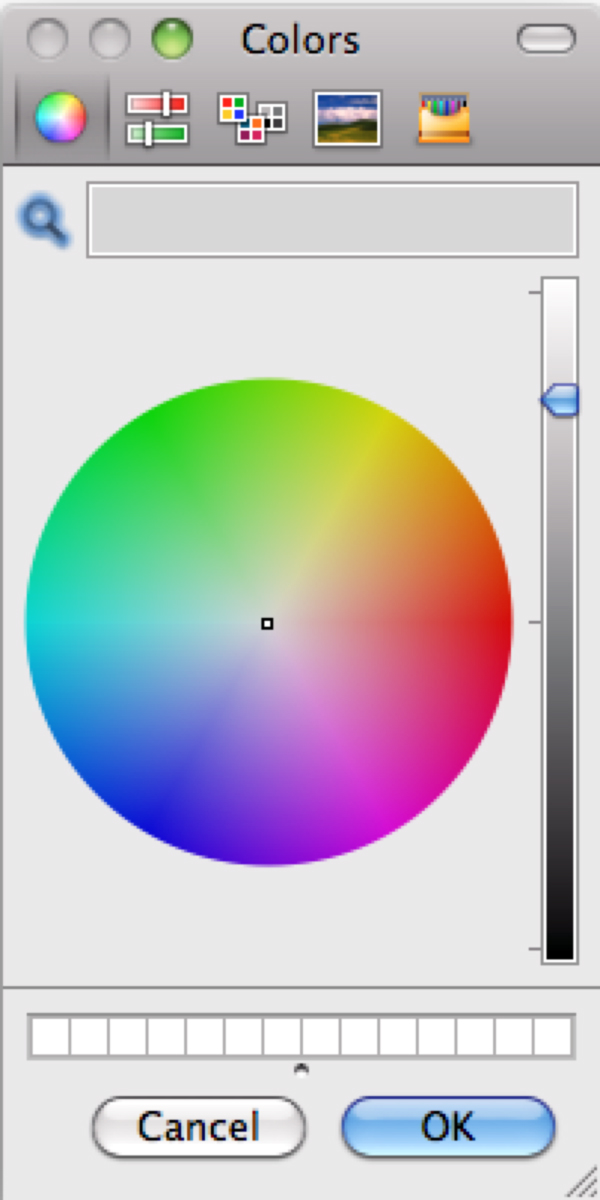
Select from the 256 "websafe" colors, type in a hex #, or adjust the alpha for a fill or stroke. Clicking on the spectrum at the top right opens a color dialog box with additional options.
DRAWING IN FLASH
Please take the time to watch the tutorials for using the tools as they have a lot more specific information on the ways to draw in Flash.
The most dramatic change in Flash in its current iteration, CS4, is the addition of the Bones tool, which allows animators to use what's called "inverse kinematics" to create animated objects (http://en.wikipedia.org/wiki/Inverse_kinematics), and the 3D tool, which offers a range of animation options that simulate three dimensions in space (not to be confused with 3D animation created in programs like 3ds Max and Maya).
When drawing in Object mode, your objects will have a blue outline around them when they're selected; make sure the object mode icon is dark, or indented, to draw in this mode.
When drawing with Object mode turned off (not indented or dark), you are working in Merge mode, where the drawn shapes seem more like bitmaps (although they are not).
Object drawing creates vector elements that are a lot like those you create in Illustrator with the pen tool, or any of the shape tools. To draw using Object mode, make sure the Object Drawing icon is selected at the bottom of the toolbar. You'll note, when drawing with this option on, that everything is surrounded by a blue rectangle—indicating it is a group (even if it's only one shape). You can change the fill and stroke color of object drawings the same way you would using Merge drawing mode; select the object with the Selection tool, and use either the Properties panel, the Color panels or the Toolbar to select different colors for each.
Merge drawing mode (with the Object Drawing mode icon turned off, or not indented and darker) works a lot like Photoshop in many regards. To select a Merge drawing object, you must double-click the fill area, which will select both the fill and the stroke. To select just the fill, click once in the fill area. To select just the stroke, click, or double-click, directly on the stroke itself.
Creating a new element on top of another in Merge drawing mode will actually delete any content underneath it, hence the name "merge" for this drawing mode. This can be frustrating or convenient, depending on what you're after.
Use both modes to see which one you prefer, and when you might want to use one over another.


When selected, a merge drawing object is speckled, while an object drawing is surrounded by a blue bounding box. Select the object Drawing icon to work in object mode, or deselect it to work in merge mode.
Editing a shape in Flash is like working with rubber bands; place the selection tool near an edge, and you will see the cursor change to an arrow with a curved shape, indicating you can bow the line. Place it near a corner, and the cursor has an L shape added, indicating you can move that corner point.
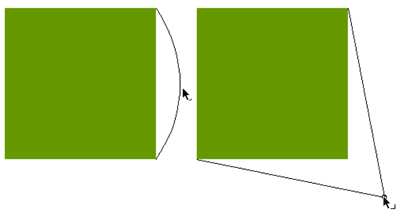
Alter shapes with the Selection tool; the curved line next to the cursor indicates you will be creating a curved edge. The cursor will have an L shape next to it when you hover over a corner point. Make sure the object is deselected first, in order to get these tool options.

When one shape overlaps another, and then is deleted, it leaves an empty space behind.
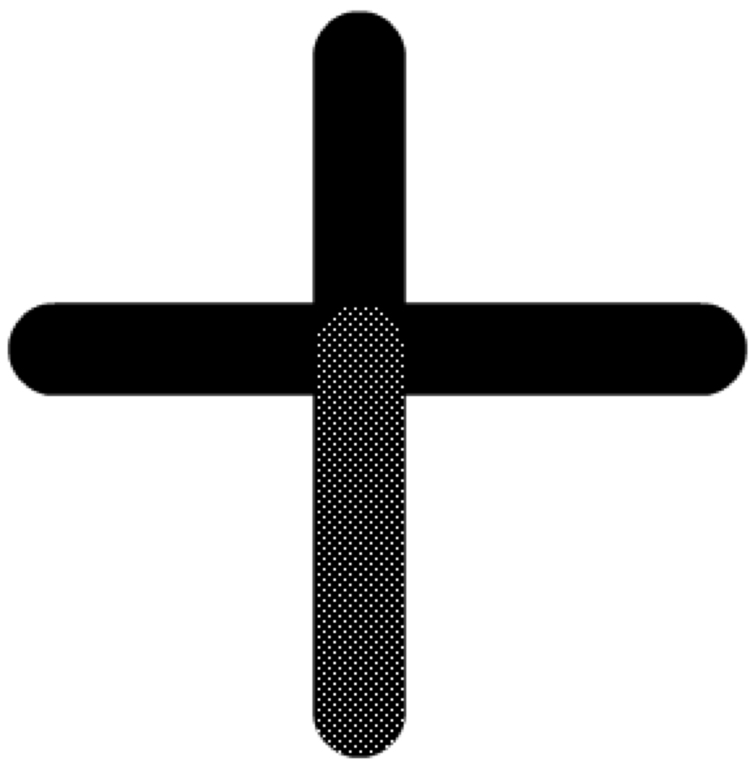
When two strokes overlap, they are divided where they intersect. To select all of them, double-click. To select specific parts, shift-click on the pieces you want.
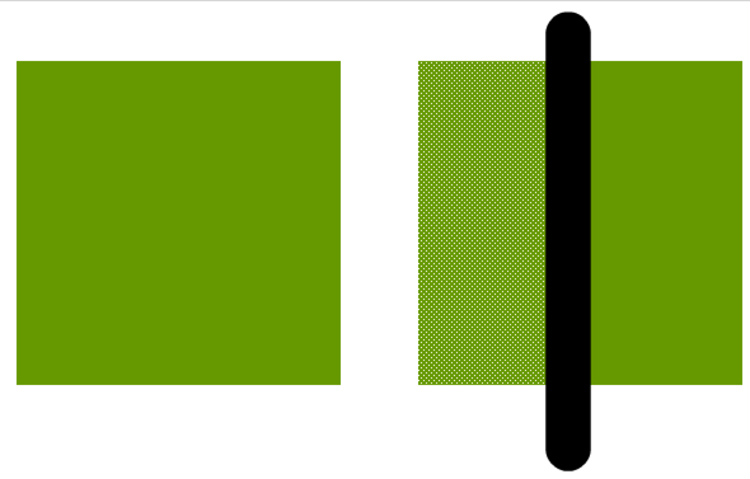
A line will dissect a shape into two parts, but both parts will remain if the line is deleted.

Drawing one shape over another will delete the section of the underlying shape, if you move the top shape away. The only way to circumvent this is to use Object drawing mode. However, using one shape to delete portions of another can come in handy at times!
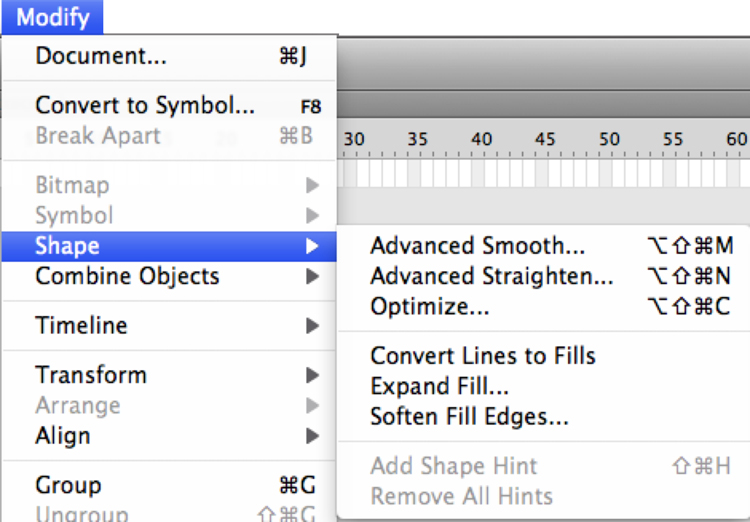
Be sure to check out the Modify > Shape, as well as Modify > Combine Objects for more ways to construct the elements you need.
Use the Subselection tool to work directly with control points.
When you select a tool, you'll notice several options at the bottom of the Toolbar; experiment with these to familiarize yourself with what they can do, and pay attention to any options that are available in the Properties panel.
You'll also discover that several tools have others hidden behind them; simply click and hold the tool to access them.
Be sure to take the time to watch the videos for using the tools and drawing options—they contain lots of tips and tricks not covered here.
PROPERTIES PANEL
A lot of what you can do in Flash, especially in terms of manipulating elements, occurs in the Properties panel, from where something is positioned, to its size, rotation, skew, color/tint, transparency, and so on. Whenever you have something selected, whether it's a tool, or an object on the stage, the Properties panel's contents change to reflect the options available.
Some important aspects are what you can do with objects on the stage in terms of their color, blending modes, and filters.
When you select a symbol on the stage, the Properties panel provides options for altering several of its, well, properties.
Note that when a movie clip or button symbol is selected, you can give it an instance name in the Properties panel. This will become important once you get into using ActionScript to control things.
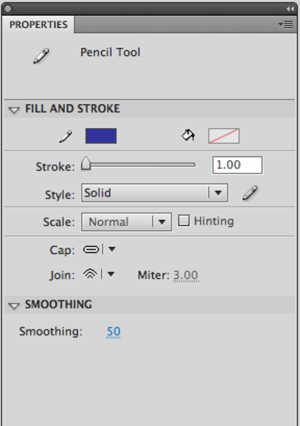
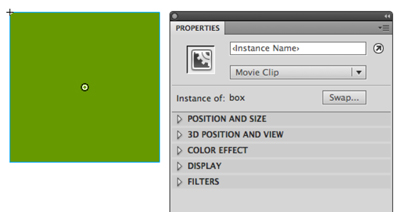
Depending on the tool or object selected, the options in the Properties pane change. When a movie clip or button symbol is selected on the stage, you can assign it an instance name.
Blending modes alter the relationship between two overlapping symbols. This is the same as using blending modes when painting in Photoshop, or setting different blending modes on layers in Photoshop and Illustrator.
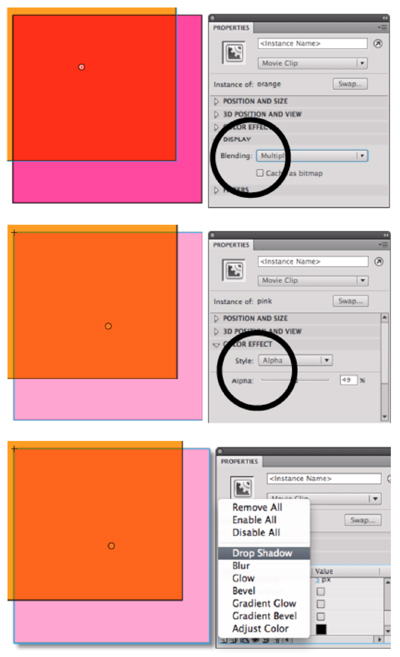
Use the Display option in the Properties panel to set blending modes, transparency, and special effects (filters) for symbols and type.
Another property you can affect using the Properties panel is the Alpha, or transparency, of a symbol or object.
You can also add filters to selected symbols and type, like bevels, drop shadows, and glows, using the Filters option.
Remember that when you alter an element using the Properties panel, you are changing an instance of it (if it's a symbol) and not the original.
The Properties pane is used to adjust stroke width, style, and color, and to establish typeface, point size, color and so on when using the Text tool.
LIBRARY PANEL
The Library panel is usually tabbed with the Properties panel, but as you generally use both all the time, it makes sense to separate them so they're both visible. Simply click on the Library tab and drag it away, then move the Library panel back under the Properties panel. You'll see a blue outline when they're about to dock together.
Anything you import into Flash is placed in the Library automatically, even if you use the Import > Import to Stage option. Deleting things from the Library will also delete them from your project, wherever you may have used them, and replace them with red boxes.
You may find you have imported or created elements that you never used in a project. Always check the Library submenu for unused items and delete them. Then use Save As to ensure Flash is paying attention. In particular, deleting unused sounds will make a huge difference in file size, but you must use Save As for that to take effect.
You can also use the Library submenu to check the particular properties of an element, to set compression schemes for photos and sounds, and to set them to export for use with ActionScript (Flash's coding language).
Symbols are the backbone of any animation, whether it's a cartoon, or a slowly fading in slideshow of photos. Anything that you want to transform in some way must be a symbol.
All symbols are stored in the Library as well, so you can reuse them whenever needed. See the section on symbols for more details.
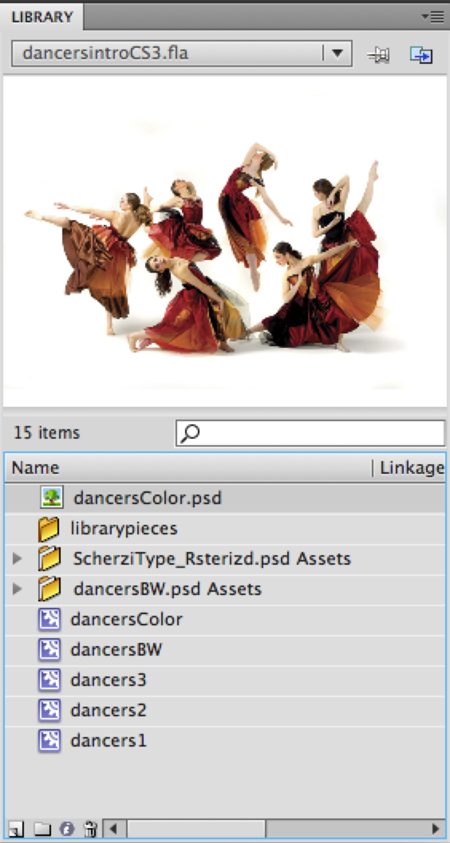
At the bottom, from left to right: create a new symbol, create a folder, symbol properties, and delete symbol.
TIMELINE
You'll be spending a lot of time using the timeline, so it's important to understand how it works.
Obviously, it has layers, just like Illustrator, Photoshop, and InDesign. The higher on the list, the more "in front" something is. Add new layers by clicking the pad icon at the bottom left.
You can drag layers up and down in the stack. The actions layer should always be on top, with a labels layer, if needed, directly below that.
Double-click a layer name to change it to something that makes sense so you know what's where.
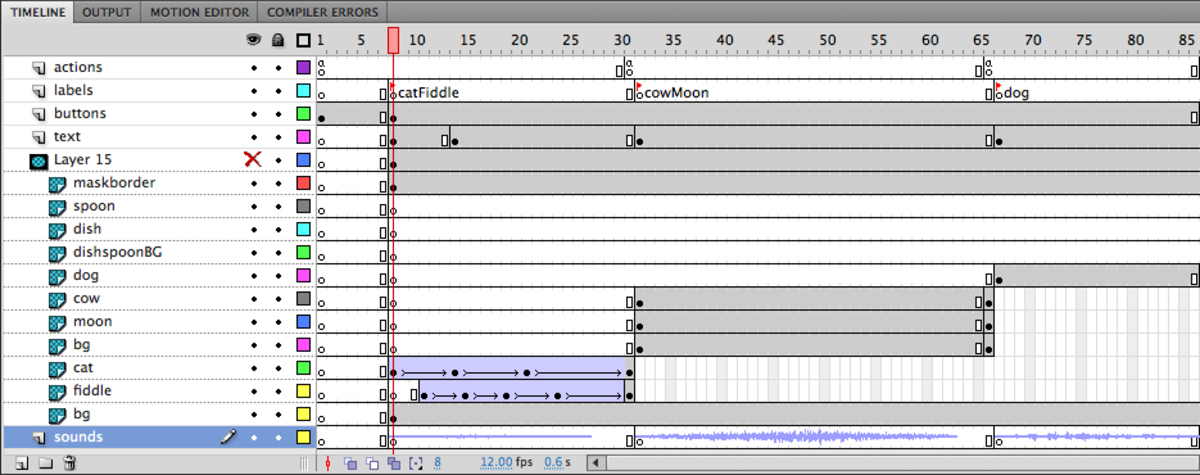
To the right of each layer are two dots. The first is the visibility of a layer (see the eye icon at the top?) Click that to hide and show layers as necessary.
The second dot locks and unlocks layers. You can still adjust some elements on a locked layer, but you can't move anything on the stage. For this reason, always lock the actions layer so you don't inadvertently place content on the stage there.
The third icon is a box that will toggle the layer view from full preview to wire frame.
Across the top of the timeline are the frame numbers. Each number represents a moment in time. In the gray bar along the bottom you'll see the current frame number, which coressponds to the frame where the playhead is located. The playhead is the red bar/box that runs top to botttom through the timeline. You can click and drag the playhead (grab the red box at the top) to "scrub" through a timeline, and clicking on a specific frame will move the playhead to that moment in time.
To place something on the stage, to add sound, to add ActionScript or labels, you must create a keyframe at that moment in time.
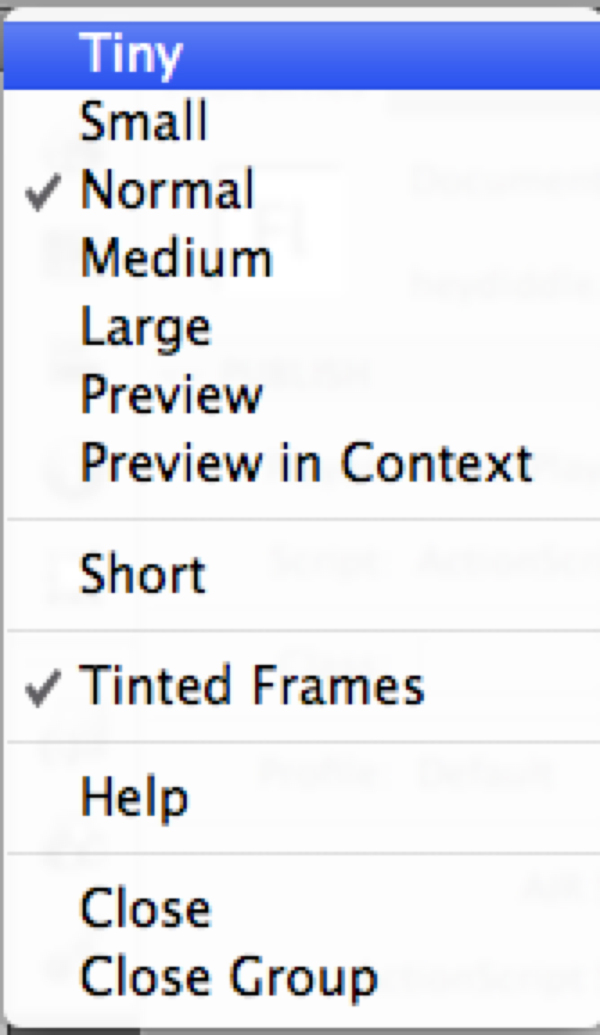
Use the timeline's submenu to adjust how it's displayed.
All layers have a keyframe in the first frame to start. To add more frames to a timeline, move the playhead to the appropriate moment in time, and press either F7, which will create an empty keyframe (hollow dot) or F8, which will copy the content on the stage in the previous keyframe and place it in the new one.
To extend the timeline without using keyframes (for button layers, for instance), select the frame and press F5 instead.
Along the bottom of the timeline is the pad icon for adding new layers, a folder icon that lets you group layers—show/hide them all at once this way, as well as keep things organized. And, the trash icon for deleting unused layers.
To the right of that are the onion skin options. When one of these is clicked, you can see several adjacent frames at the same time. This can be useful when trying to align things—in a frame by frame animation, for instance.
To the right of those is the current frame number, the speed of the timeline (in this case, 24 fps, which is the default) and the length of the animation at that moment (i.e. in frame 8, the project is .6 seconds long).
The scrollbar at the bottom lets you move to a distant frame quickly.
You can also use the > and < keys to move through the timeline one frame at a time.
All the way to the top right is the timeline's submenu where you can decide how to display the frames.
Always keep buttons on their own layer. Keep text on its own layer, sounds on a separate layer, and so on. Once you get into animating objects, each animated piece must also be on its own layer. Naming things is very important, especially in a complex project—and that goes for frames, symbols and instances (don't worry, you'll get there in a minute!) as well.
COLOR PANEL
Creating new colors and gradients is fairly straight forward. Access the color/gradient panels from the Window menu.
First select the pencil to adjust a stroke color, or the bucket for a fill color. Then choose whether you want a solid or a gradient, or a bitmap fill from the popup menu immediately to the right.
To create a new color, move the cursor around in the Color Mixer's spectrum until you find the one you're interested in. Experiment with the different view options by pressing the H, S, B, R, G, and B options. Using the H (hue) option will give you a view like the Color Picker in Photoshop and Illustrator.
Change the intensity or hue of a color by moving the little triangle on the color bar to adjust it.
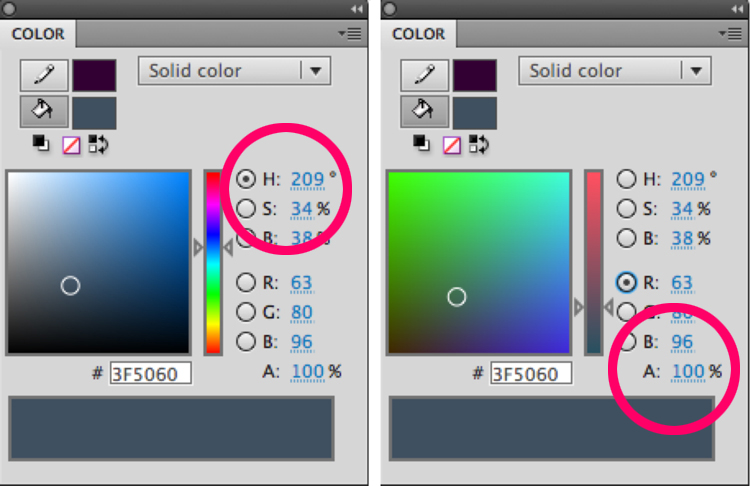
The color options change a bit depending on what color mode you're using. Choose H to get one that looks most like the Color Picker in Photoshop or Illustrator. In any instance, you can add a hex number here (code for a web color), and adjust the transparency of something using the A at the bottom right.
You can also adjust the alpha (transparency) of the color using the A slider at the bottom right.
Save new colors and gradients by choosing "add swatch" from the panel's options menu.
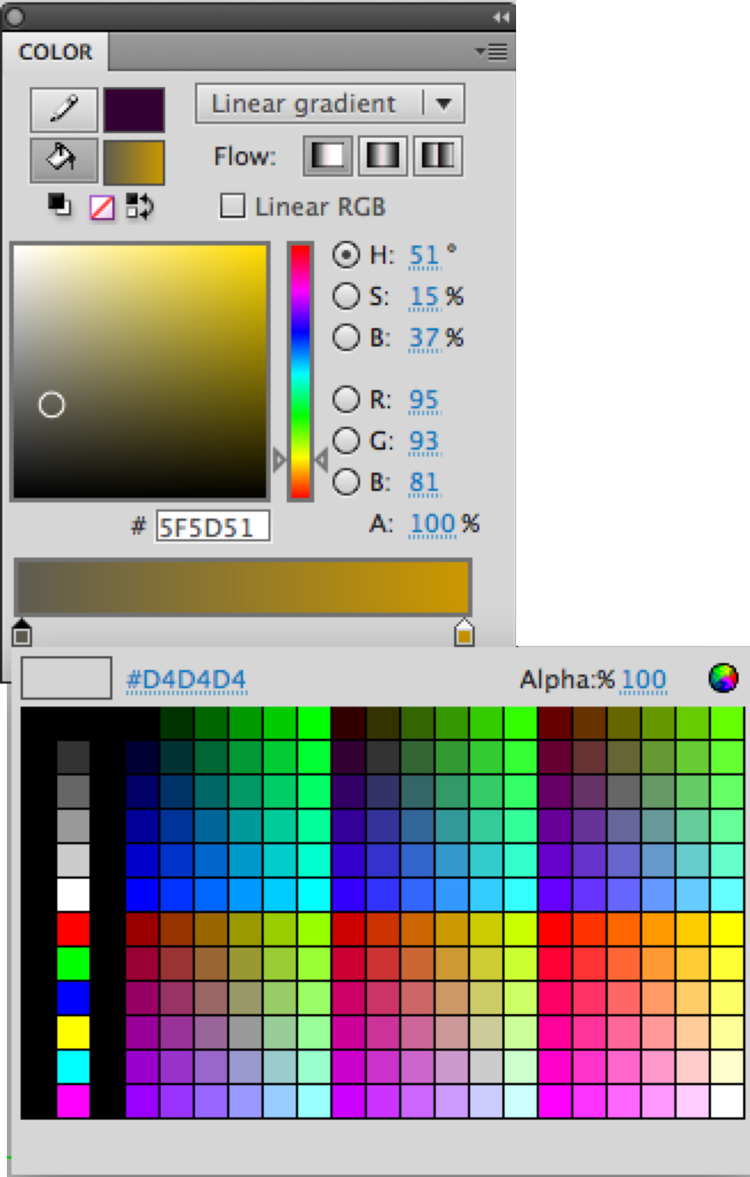
Double-click a slider in the gradient bar to select the color you want, or type in a hex number. Or, move the dot in the color field to choose something more unique.
GRADIENTS
Creating a new gradient is fairly simple. Select the gradient type, then double-click on one of the color tabs in the gradient slider to set a new color web safe color, or move the circle around in the color field. Change the hue by moving the triangles in the spectrum bar. Repeat these steps for each tab in your gradient. Add new tabs by clicking below the gradient bar.
Draw the object and fill it with the desired gradient. Then select the Gradient tool (behind the Free Transform tool). Click in the gradient shape to select it.
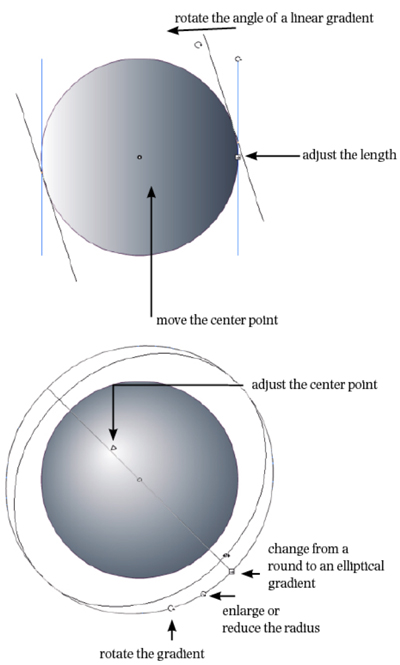
A linear gradient will have two bars,one on either edge, indicating the start and end points of the gradient, as well as a circle representing the midpoint.
Click the circle end of the bar to rotate the gradient. Use the box in the center of the bar to adjust the length, and click and drag the circle between the two bars to shift the midpoint.
To rotate a linear gradient, click on the circle at about o'clock and drag it to the desired rotation.
To enlarge or reduce the length of a radial gradient move the circle at about 4o'clock in or out as desired.
To reshape a radial gradient (into an ellipse), grab the square icon and move it in or out.
To set a new center point for a radial gradient, click on the triangle near the center point and drag it to a new location.
BITMAP FILLS
Using a bitmap (an imported bitmapped image, like a photograph) fills a shape with that image. This is useful if you want to put the image in an unusual shape, for some reason. A small image will tile, creating a pattern of sorts.
Import the image you want to use.
Create the "container" using a shape tool, the pencil, or pen tool. Select Bitmap from the fill options in the Color panel, or you can select the image itself from the fill or stroke options in the Toolbar or Properties panel.
Using the Paintbrush will fill the brushstrokes with the bitmap, which can create an interesting effect as well.
Use small bits to create a textured background, or silhouette a larger image by drawing a container shape for the specific piece of the image you want to silhouette.
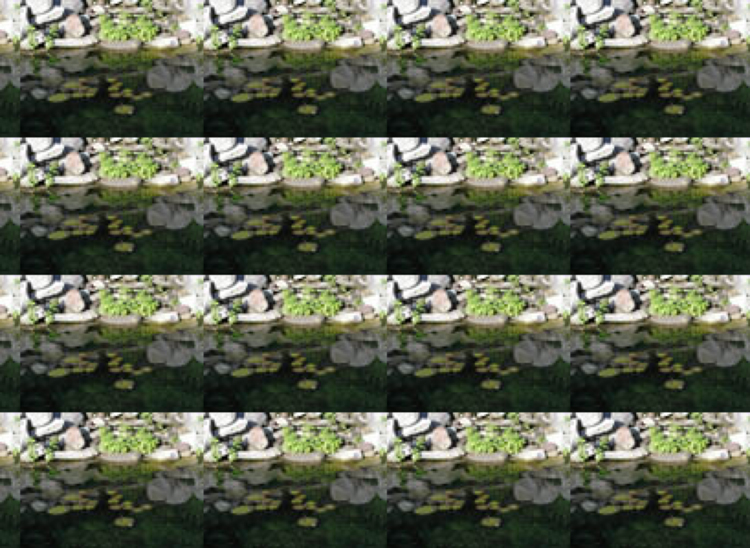
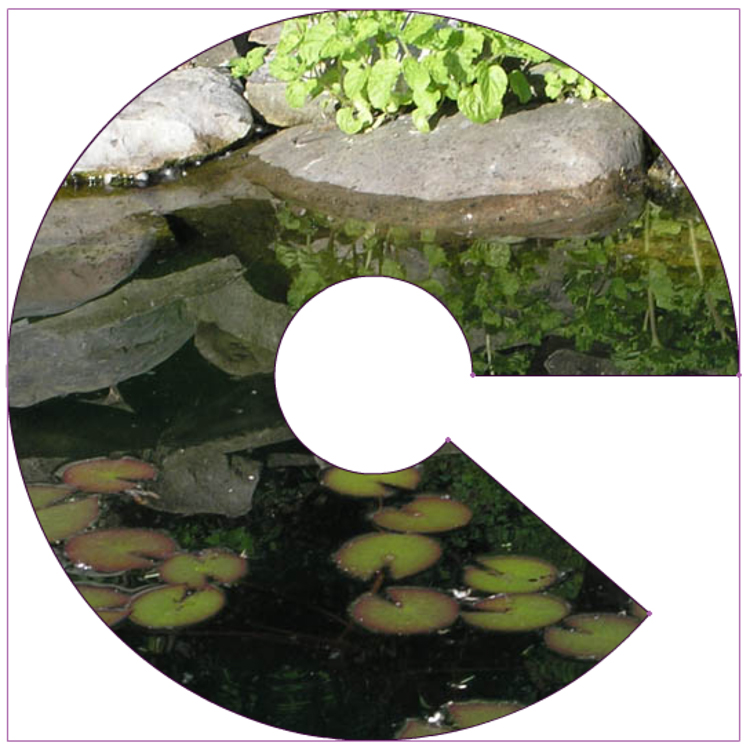
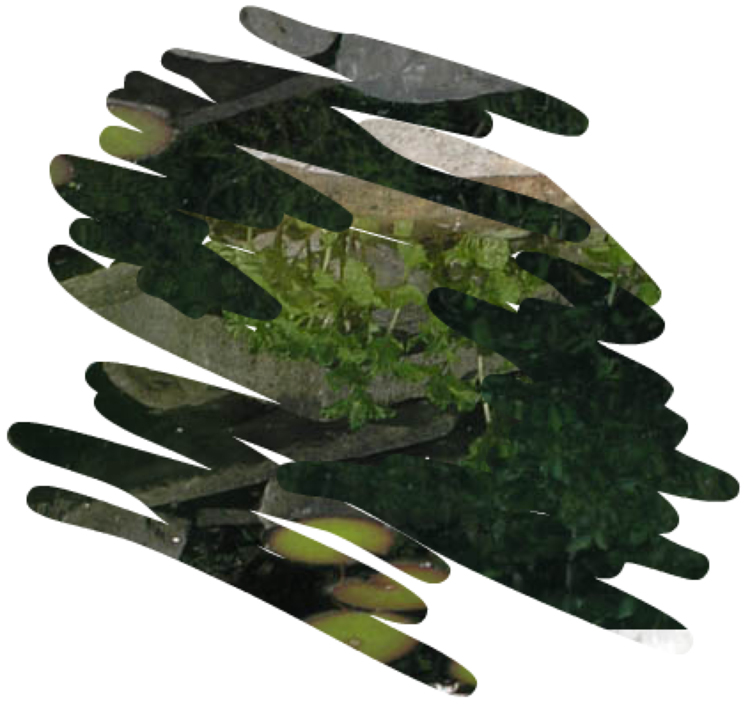
A small image will tile when used as a fill. Use larger images and create unusual shapes for special effects.
YOUR TURN
In this first Flash assignment, you'll be exploring the drawing tools to develop an intro page (index.html). This will serve as our portal to viewing the work you create using Flash. Ultimately, it will have functional links to all the Flash assignments.
This home page should be designed to reflect your personality. Feel free to include a drawing of yourself (do NOT use photos for this assignment, except as reference!), and/or graphics that give us some insight as to your personal design style.
You also need to include either text or graphics, or a combination of both, that will eventually become buttons that link to the assignments. The ones that you need to include are:
- Animation
- Slideshow
- External Text
- Jukebox
- Game
- loadMovie
You'll be adding functionality to these links as you complete each project.
Create a new folder in your root folder called "flash" (no quotes). Save and publish your new homepage (be sure it is called index.html) in this new folder and upload it to your web space.
Put your URL in a Word document and upload it to the appropriate place in Blackboard.
Your URL will be the same as it has been—just add the new folder name after the ...syr.edu/