OPTIMIZING CONTENT
While there are several things with which you may not be familiar with yet, please take the time to read through this section. The information here will come in handy now and throughout your Flash explorations.
IMAGES
First, when working in Flash, use vector graphics whenever possible. The only reason to use a raster, or bitmap, image is if it's a photo and there's no way around using photography. Button graphics, design elements, logos and banners, backgrounds... should all be vector graphics whenever possible.
When you need to use a bitmap photograph, there are several important steps you need to take using either Photoshop or Fireworks before you even import it into Flash:
Crop the image: eliminate any outside portions that you don't need.
Resize the image: use Image Size to set the dimensions of your photograph; remember to keep Constrain Proportions checked in Photoshop, or the lock icon set in Fireworks so the image isn't distorted in the process. Remember that you should never enlarge an image unless you can simultaneously reduce the pixels per inch (ppi) in proportion.
Set the ppi to 72. Making it higher is not going to make the image better, since in a Flash file, it will only ever be displayed on a monitor.
You can save your file as a PNG or a JPG.
You could even import a PSD file, if you wanted. Your Flash size will differ, but once published as a SWF, you'll find very little difference between them:
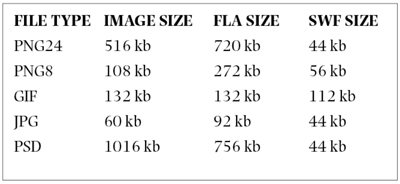
You can see from the comparison above that even though the Photoshop file produced the largest FLA, it also tied for generating the smallest SWF file. The difference in the image quality of the SWF between the PNG 24, the JPG, and the PSD versions are negligible, until you start compressing them further in Flash.

(left) The results of the JPG at an additional JPG compression of 50% within Flash. (right) The results of the Photoshop (PSD) image with a JPG compression of 50% within Flash)
Even the largest image in a Flash file, when compressed, can produce a smaller SWF than starting with a JPG image, and retain better image quality. It's worth the time to experiment a bit with the different settings, since the balance between load time and quality is always delicate.
Once you have an image optimized and imported, you can optimize it again within Flash. Doing so will definitely improve the file size of the SWF when it's published, and it can also produce less-than-desirable visual results.
To choose the optimization quality within Flash, double-click the image in the Library panel to open the Bitmap Properties dialog box. Note that it allows you to choose from Photo (JPG) or lossless PNG/GIF compression schemes. Choosing PNG/GIF produces a better quality image, an d a larger file size.
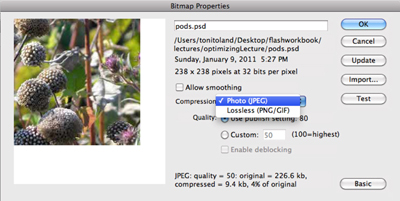
You can use the current publish setting (by default, it's set to 80%), or set your own for the JPG option. You can also choose lossless PNG/GIF instead of JPG to preserve quality, but your SWF will be significantly larger (in this case, it went from 20 kb to 700 kb—not acceptable for the web!
You can use the current publish setting (by default, it's set to 80%), or set your own for the JPG option. You can also choose lossless PNG/GIF instead of JPG to preserve quality, but your SWF will be significantly larger (in this case, it went from 20 kb to 700 kb—not acceptable for the web!
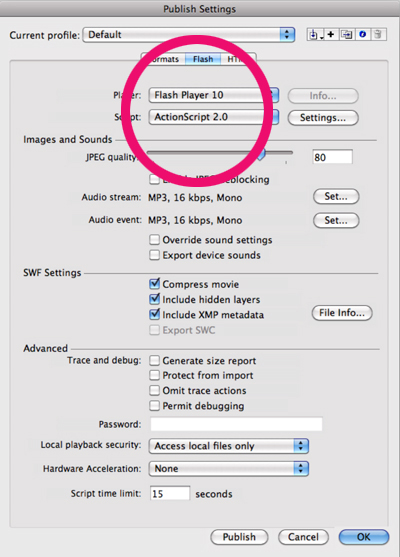
The final place where you can establish export preferences is in the Publish Settings dialog box (File > Publish Settings) where any images that haven't been set to a specific compression are all compressed at the same level.
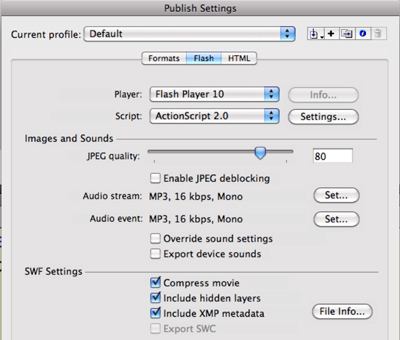
Use File > Publish Settings to set the default JPG compression for bitmap images. Note, too, the audio options here, which we'll be looking at shortly.
Use File > Publish Settings to set the default JPG compression for bitmap images. Note, too, the audio options here, which we'll be looking at shortly.
OPTIMIZING SOUNDS
Flash automatically compresses sounds using MP3 compression, although you have some control over the quality before publishing your file.
As with images, it's important to optimize sound before importing it to Flash. Use sound editing software like Audacity, or SoundBooth to crop off any parts of the music or dialog that you do not need, especially silence at the beginning and end. If you want music to loop seamlessly, you may have to play with it a bit in the sound editing software to make a smooth loop—it takes some time, but it's very worth it in terms of quality as well as file size. A shorter sound clip that can loop seamlessly will take up less space than a whole song.
Flash can import multiple sound formats, and of course a smaller original sound file is going to produce a smaller FLA and SWF file size as well. Again, however, you need to balance quality and download time to arrive at the ideal.
I created an AIF sound file that was a music bed, about 2 minutes in length. It was composed of a much shorter piece that I copied and pasted multiple times.
The sound created from the copied and pasted piece was 4.2 MB and translated into a FLA file about 2.9 MB in size, with a SWF of 64 kb
The original short piece, set to loop within Flash, was 1.4 MB and translated into a 1.4 MB FLA, with a SWF of 20 kb
The larger AIF sound file produced a FLA of 2.9 MB, and the same sound saved as an MP3 produced a FLA of 916 kb. The SWFs were, on the other hand, 64 kb for the AIF sound, and 504 kb for the MP3 sound, at the default MP3 settings. By unchecking "Use Imported MP3 quality," the SWF was reduced to 96 kb. As with images, it pays to take the time to experiment a little.
Breaking dialog into smaller chunks, rather than having one huge sound file, can save some file size, both in the FLA and the published SWF. The real advantage is that you can optimize the individual pieces when using multiple sound files to control the quality, whereas you'd have to optimize the entire thing at once when using a single larger file. Smaller sounds can also be sync'ed to the timeline with more precision.
To set the compression settings within Flash, double-click the sound in the Library. You should use MP3 compression whenever possible, even for dialog as long as the quality holds up.
Below the compression settings you can select the bit rate (processing speed) and quality. Always test a couple of different bit rates as you can often select something a bit higher without compromising of file size.
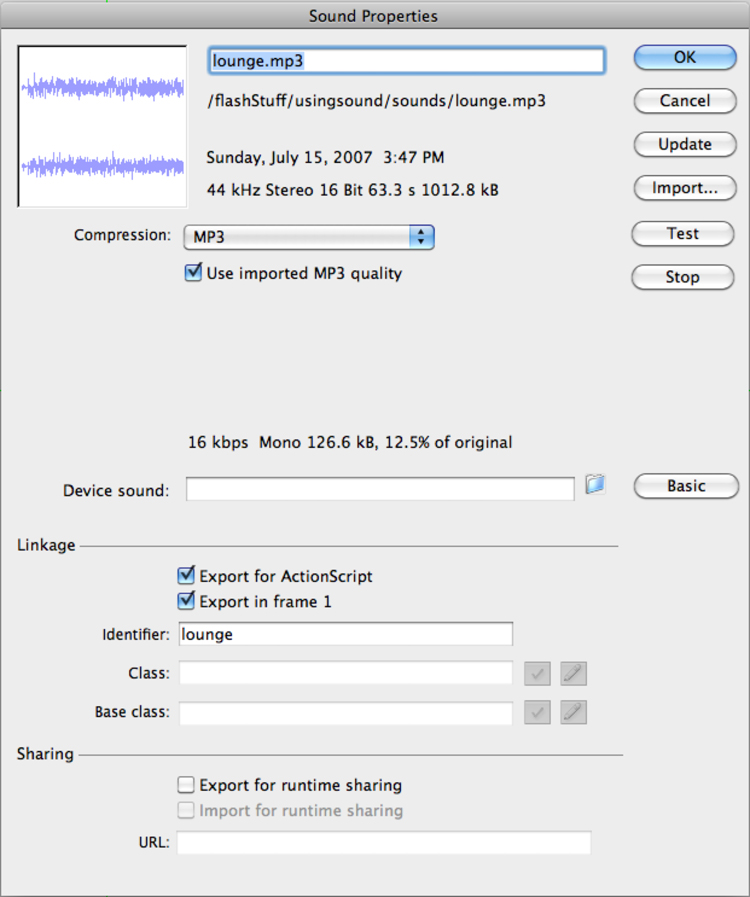
Select from a variety of compression options; MP3 works well for music, and Speech is a reasonable choice for dialog if MP3 quality isn't good enough. Note at the bottom that Flash tells you how much smaller the compressed file will be than the original.)
BANDWIDTH PROFILER
Once you have everything organized and optimized to your liking, you can see the overall results when you test your movie by using the Bandwidth Profiler. After selecting Control > Test Movie (Command R eturn / Ctrl Enter) choose View > View Bandwidth Profiler.

The Bandwidth Profiler for a movie with music and several bitmaps; it will take about 13 minutes for this file to download on a 56K modem. No one's going to wait around for that! 1166/60
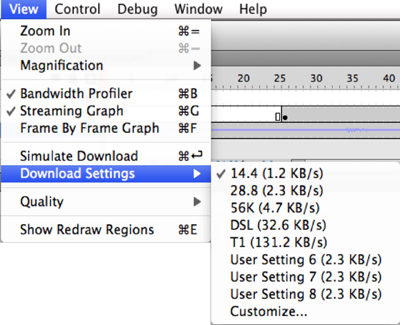
While testing your project, use the View > Download Settings to choose the speed of the download; this option is only available when testing a movie.
The bandwidth profiler shows you how long the file will take to download—in the top portion at the left (Movie) note the bottom line—Preload—and the length of time it will take (798 seconds, or about 13 minutes!). In a file with bitmaps and sound, the Bandwidth Profiler will show you where there is a lot of data, and where the amount is within reason.
In the previous example, the sound file is huge, hence the very tall gray bar at the beginning. The shorter gray bars after that represent new instances of bitmaps. Anything below the red line will load in real time at the current modem speed; anything above it will cause the file to "hang" until the data loads.
Set the modem speed using Control > Download Settings. Use Customize to set atypical speeds.
If you find that the results are not satisfactory, go back to the Library and work on the compression options a bit more.
Once all is well, use File > Publish Settings to further tweak file size.
PUBLISHING FLASH FOR THE WEB
Before you can put Flash content online, you need to generate at least two different files; the SWF, and the HTML file that contains the SWF file. Flash does this for you very quickly when you select File > Publish, but first, it's important to set up the publish settings so the correct files are generated. Note that these files are always saved in the same folder or directory as the original FLA file, unless you specify otherwise.
Go ahead and open the Publish Settings options.
In the first pane you get to decide what files you'd like Flash to generate for you. To post your home –page assignment on the web you'll need the SWF file, and the HTML file, so make sure both of those are checked (they are typically selected by default).
Flash will assume you want to call your published files by the FLA file name. You can leave this as is, or rename them. Be very careful, however, if you decide to rename things as that can sometimes prevent the file from opening later on.
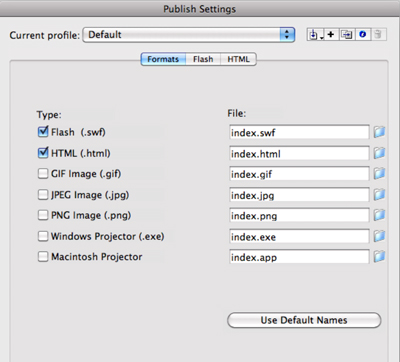
If you want to save the exported files in a new location, click the folder icon to relocate them. This can be handy if you want to keep the FLA files separate from those that will actually go on the remote server.
In the Flash pane of Publish Settings, you can decide what version of the Flash Player you want people to use to see your work, along with the ActionScript version. Use this panel to switch from AS2 to AS3 or vice cersa, if necessary.
There are a lot of other options here, but for now, leaving them set at the defaults if fine.
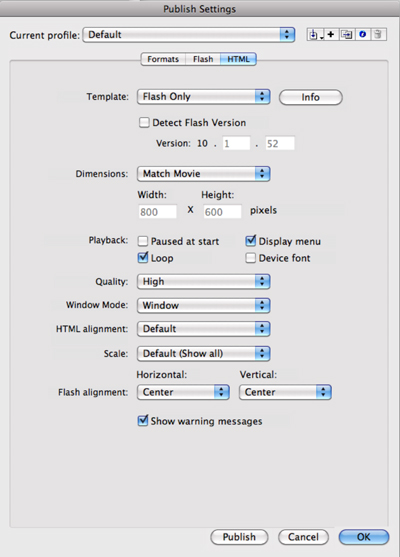
The HTML pane offers some options as to how the HTML portion of the exported file is generated. For this exploration, the Flash Only option is the appropriate Template choice. The other options in this dropdown menu are suitable for generating the required HTML code for more sophisticated Flash applications.
Select Detect Flash Version if you want Flash to include the code that will let someone know if they need a newer Flash Player.
For Dimensions, using Match Movie is the most likely choice, as you should have set your stage size to the size you wanted. If you'd like to experiment with the other options, try setting the pixel dimensions, or a percentage, but do be careful not to distort your stage!
The Playback options let you determine whether you want your Flash piece to start playing automatically or not. You can also decide whether to offer your audience a Display menu to zoom in or out, play, loop, rewind, and so on.
Checking Device Font causes the HTML file to look for any fonts used in your animation on the viewer's computer (PC users only).
Quality determines how your SWF will be drawn or rendered; the higher the setting, the more processor-intensive your HTML page will be.
Select Window for the Window mode; if this is going to be the only thing on the page, you don't want to make the background transparent, or opaque. Setting it to Transparent Windowless saves the stage color, but assigning a new background color or image to the HTML file renders that color transparent.
The alignment option is set to centered by default, but this really only aligns your SWF file at the top left. To actually center it on the page, create a CSS rule in the HTML file in Dreamweaver, after it's been published.
Use the Scale options to determine whether you want your entire SWF to show (of course you do!), or whether it should stretch or squish, based on the dimensions you set under the Flash tab.
The final Alignment option determines where, top to bottom, and left to right the HTML places the SWF file in relation to the dimensions you set earlier.
Once you've got all these decisions made, hit Publish. The HTML file, and the SWF file, will be saved to the same folder where the original FLA file is saved (unless you changed that in the Formats tab). To view your creation on the web, upload both the SWF file and the HTML file to the server.
