SOUND
One of the most important aspects about using sound is the issue of copyright. As you know from writing research papers, when you quote a book or article, you must credit that source with a footnote or within the text of the paper. Copyright it not a huge issue there, unless you neglect to cite your resources, at which point, you would be guilty of plagiarism.
"Borrowing" images from books, magazines, or stock photo websites is also something that should be credited in a class project, whether it's a print document, or a web site. But you should never use someone else's imagery—illustrative, or photographic—in a site you develop for profit (i.e. someone is paying you to do it, or the person for whom you create it will be making money from it).
In both cases, you can actually see the thing you've "borrowed" or referred to, either as text or image. Sound, on the other hand isn't visible, it isn't something you can touch or taste. And because it's so ephemeral, a lot of people think that the copyright laws that apply to writing, and art and design work don't apply to music. That's absolutely not the case, so you need to be extra careful about choosing to use sound in a Flash project; get permission, pay outright for the music, or pay a royalty. And, it's not just the performance that may be copyrighted, it's the actual music composition itself.
The good news is that for school projects, as long as you credit the source and you don't post your work on youtube or another public venue, you can use just about anything you can find.
Now that you're aware of the very basic legal aspects of using sound in Flash, let's look at the many ways to do it.
SOUND FORMATS
Flash is pretty generous in recognizing a variety of sound file formats.
Before importing sound(s) use a sound editing program like Audacity or Soundbooth to crop any dead space at the beginning or end of the piece. if you don't need to play an entire song, then delete the parts you don't want. Remember to use "Save As" so you don't destroy the original recording! Just as with photos, you don't want Flash to process information that won't be used; that just bloats the file size to no advantage.
Once the sound is ready, use File > Import > Import to Stage or Library. Sounds are automatically placed in the Library and not the stage. Drag the sound from the library to the stage at the keyframe where you want the sound to play. Before we get there, however, it's important to ensure the sound is optimized.
Double-click the sound icon in the Library panel to access the Sound Properties panel.
Make sure you select the right compression scheme for the sound you are using. By default, Flash typically uses MP3 compression. If your sound is dialog for a character, you might want to use the Speech setting. Experiment with all the options, and use the Test button to listen to how each one affects the quality of the sound. You'll note at the bottom you can set a bit rate—the speed at which the sound will be downloaded—as well as quality. Generally you can leave the quality at Fast, but if you change the bit rate to 24, you can also uncheck the
Convert stereo to mono option, which provides a nicer sound with minimal increase in file size.
If you don't set the properties for each sound, Flash will compress them all the same, at MP3 quality.
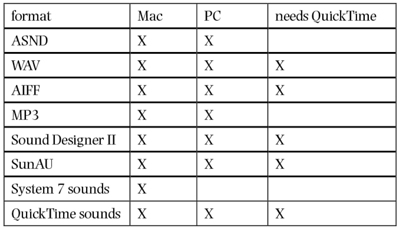
SYNCHRONIZATION
There are several sound synchronization types in Flash:
Event sounds play when the playhead reaches the keyframe where the sound has been placed; they play until they are finished, which means that if the movie loops, and reaches that keyframe before the sound is completed the first time, it will play again on top of itself. Noisy! Event sounds are great for sound effects, and button clicks.
Streaming sounds start playing as soon as they begin to download and are dependant on the timeline. A streaming sound will stop playing when it hits a stop action in the timeline. Streaming sounds stay in sync with the frame rate of your movie. If Flash can't draw content fast enough, it will skip frames, rather than chop up the sound.
The start option is used when you want an event sound, but do not want it to play over itself; if one instance of the sound is playing, using start, instead of event, will prevent it from playing until the first instance has completed.
Stop is used to stop a sound that is already playing.
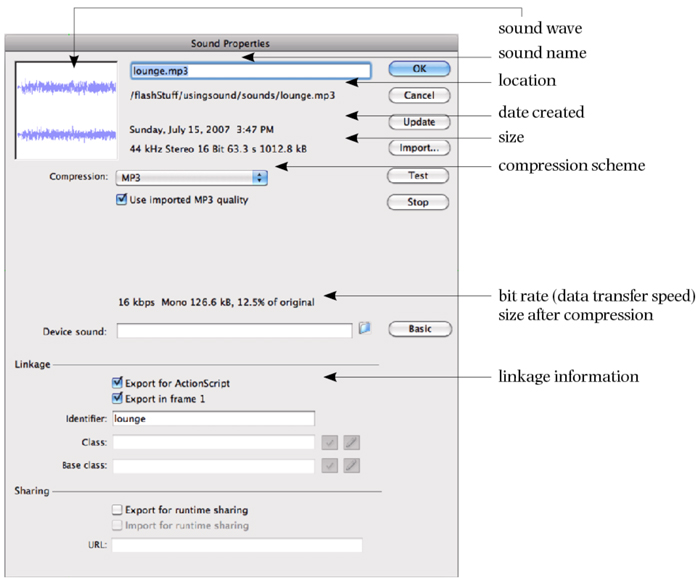
Use the sound file's properties (in the Library) to establish the compression and quality for each piece of music or dialog you import.
LINKING SOUNDS TO THE TIMELINE
If you are adding sound for ambiance, background music or something like that, you might do better to link it to the file at runtime. That is, the sound is in the library, and you code it to play using ActionScript, rather than placing it in the timeline. Linked sound plays independently of the timeline.
This is particularly useful when designing a multiple page website, where user behavior can't be predicted; the sound remains constant, no matter what "page" within the SWF the user goes to.
Here are the steps for adding sound to a Flash file with this method:
First, edit the sound in an external sound editing program; you don't want to import a huge file if you only want some of it to play.
Create a new Flash AS2 file, or open one that you'd like to add sound to.
Import the sound using File > Import > Import to Stage or Library (it will be placed in the Library, not the stage, in either case).
Double-click the sound icon in the Library to set the appropriate compression settings.
While you're in the Sound Properties panel, click the Advanced option.
Click the Export for ActionScript option—Export in frame 1 will be checked automatically.
Give your sound a unique name; you can call it what it's called in the library, or modify the name to something shorter, as in the above illustration (simply lounge instead of lounge.mp3).
Remember what you've called it as you'll be using this identifier in your code.
Click OK to save these settings and get back to the main timeline.
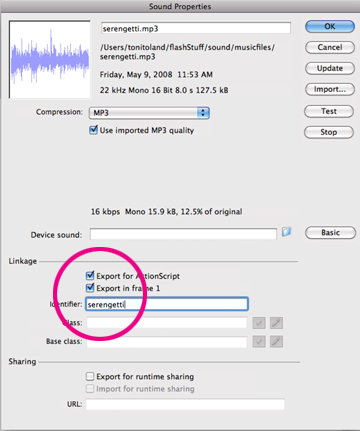
Use the Advanced portion of the sound properties panel to export if for ActionScript. Keep the Identifier short and sweet—no spaces!!
Design a button symbol to start the sound, and another one to stop the sound. You can use the same symbol two times, and just change any label on the main timeline if you want.
Select the instance of the play button on the stage, and give it an instance name (play_btn would work).
Select the instance of the stop button and give it an instance name, too (stop_btn).
Name this layer "buttons" and lock it.
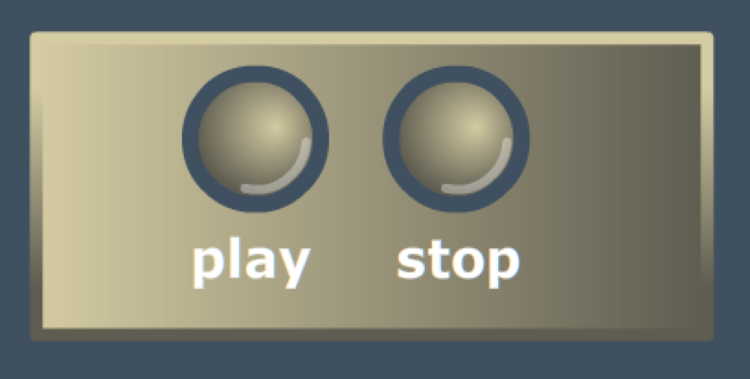
Create buttons to start and stop the sound.
Add a new layer named "actions" and lock it as well.
Highlight the first frame in the actions layer and open the Actions pane. Here is the code you need to type for an ActionScript2 file :
stop();
var my_song = new Sound();
my_song.attachSound("identifiername");
play_btn.onRelease = function() {
my_song.start();
};
play_btn.onPress = function() {
my_song.stop();
};
stop_btn.onRelease = function() {
my_song.stop();
};
song.start();
Here's how the code works:
The first line just keeps the movie from playing; if you want the movie to play, delete the stop code.
In the second line, you defined a variable called "my_song" and as you know, you can use any name that you want (my_sound, bg_snd, whatever makes sense to you).
The third line tells Flash what sound in the library you want to play, and that's a string so it needs to be in quotes ("identifiername" was the identifier we used when linking the sound).
Then you refer to the instance names for the buttons, and tell Flash what to do when they are pressed and released. Note there are two functions for the play_btn, so if you press it more than once, the press action stops the sound, and the release action starts it. That prevents the sound from playing over itself. Note, too, that the variable name tells Flash what sound to play.
Finally, the last line tells Flash to start playing the song immediately. If you'd rather not have the music start automatically, delete this last line.
Save this file so you can refer back to it the next time you want to add background music to a Flash project. You can even select and copy the frames, and paste them into a movie clip symbol to use whenever you need it; just import a new song, and set up the linkage again.
To do the same thing using AS3, create all the graphics and button symbols you need, and then give each symbol (the start and stop buttons, at any rate) instance names in the Properties panel.
Import the music you want to play.
Control-click / right-click on the sound in the Library and select Properties from the popup menu.
Click the Advanced tab at the bottom of the Sound Properties window, if it isn't already expanded.
Under the Linkage options, click Export for AS. The Export in first frame option will automatically become checked as well, and Flash adds the Sound class to the Base class field and then adds the sound name to the Class field automatically.
Classes should always start with a capital letter, and like a variable or a function, you can name this class anything you want. Change the Class name to MySound.
Click OK. You will get a "warning" which is just telling you that Flash will automatically create a new class for you, called MySound. Click OK again.
Now you need to add the code that establishes MySound as a variable, write the functions to control it, and then add the eventListeners for each button. Highlight the first frame in the actions layer and type this code into the Actions pane:
var mySound:MySound = new MySound();
var sndControl:SoundChannel = new SoundChannel;
function sndPlay(event:MouseEvent): void {
sndControl = mySound.play(0, 999);
}
function sndStop(event:MouseEvent): void {
SoundMixer.stopAll();
}
playBtn.addEventListener(MouseEvent.CLICK, sndPlay);
playBtn.addEventListener(MouseEvent.MOUSE_DOWN, sndStop);
stopBtn.addEventListener(MouseEvent.CLICK, sndStop);
Note in this code that we've added a MOUSE_DOWN listener to stop the sound if the play button is pressed more than once.
Save your file and test the movie. Very nice!
LOADING EXTERNAL SOUNDS
This is a good process to have in your repertoire. Loading sound externally creates small FLA and SWF files, and gives the user great flexibility in determining which song they might want to listen to.
USING AS2
The key to success here, as with using loadMovie and loadMovieNum, is to keep your MP3 files in the same folder as the player FLA file.
1. First gather the MP3 files. There are many ways to go about this - and since iTunes has moved to using m4p format, learning how to translate them back into MP3 files may be valuable.
2. Open iTunes (if you don't use iTunes, many sound editing programs out there may be able to do this for you as well), and then open iTunes preferences.
NOTE: You can only do this with songs you import from your own CDs. Any music purchased from the Apple iTunes store cannot be converted to an MP3 file.
3. Click the General tab, and then the Import Settings tab within that pane.
4. In the Import Using field, select MP3 Encoder.
5. Click OK to exit this dialog box, and then OK again to exit iTunes Preferences.
6. Locate the song you want to use in your music library and control-click (Mac)/right-click (PC) on it.
7. From the contextual menu, choose "Create MP3 Version."
8. Exit iTunes and go to your iTunes library to locate the MP3 version of your song. Copy or move this file to a new folder on your hard drive. This is where you'll save all your MP3 files, along with the FLA and SWF you will create to play them.
NOTE: You can only do this with songs you import from your own CDs. Any music purchased from the Apple iTunes store cannot be converted to an MP3 file.
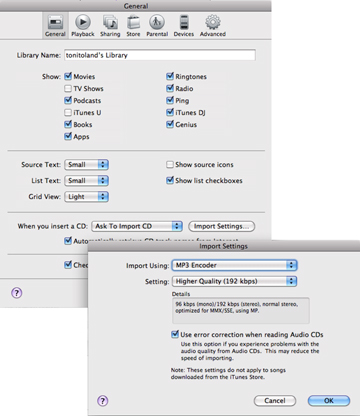
Use iTunes> Preferences to set the Import Using option to MP3.
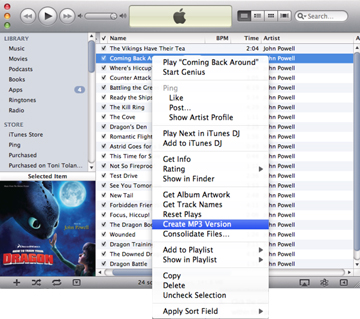
Control-click / right-click on the song you want to convert to create an MP3 version.
9. Open a new Flash document, and set the ActionScript to 2.0
10. Create any graphics you want for the background and lock the layer(s) when you're finished.
11. Create a new layer for the buttons. You'll need a button for each song you want to play; use several instances of the same button, or create separate buttons for each song.
12. Select each button on the stage, one at a time, and add this code in the Actions pane:
on (release){
stopAllSounds();
song1 = new Sound()
song1.loadSound("song1.mp3", true);
}
13. The code in red (above) is what must change for each button. In particular, the name of the song (in this example "song1.mp3") should be the exact name of the song you want to load; this is case sensitive, and needs to appear within quotes. "song1" also needs to change with each button (to "song2," song3," etc.). Note you must include the MP3 extension.
14. Save your movie in the same folder where the MP3 files reside, and test your movie!
15. If you get really brave, you can use some of the techniques you used in the slideshow assignment to gotoAndPlay a named frame, where you could have a movie clip that displays the song title, artist, and so on.
USING AS3
You'll need the same sort of graphics and interface to do this using ActionScript 3—specifically, a named button instance for each song you want to play.
Prepare and save the MP3 files just the way you did is using the AS2 process, then open an AS3 file and create the graphics you want.
Give each button a unique instance name in the Properties panel, then in the first frame of the actions layer, use this code (change the names of the buttons and songs as appropriate)
//songs
var mySound1:Sound = new Sound(new URLRequest("song1.mp3"));
var mySound2:Sound = new Sound(new URLRequest("song2.mp3"));
var mySound3:Sound = new Sound(new URLRequest("song3.mp3"));
//sound "containers"
var channel1:SoundChannel = new SoundChannel();
var channel2:SoundChannel = new SoundChannel();
var channel3:SoundChannel = new SoundChannel();
//buttons
song1.addEventListener(MouseEvent.CLICK, playSong1);
song2.addEventListener(MouseEvent.CLICK, playSong2);
song3.addEventListener(MouseEvent.CLICK,
playSong3);
//functions that play the songs
function playSong1(event:MouseEvent):void {
SoundMixer.stopAll();
mySound1.play();
}
function playSong2(event:MouseEvent):void {
SoundMixer.stopAll();
mySound2.play();
}
function playSong3(event:MouseEvent):void {
SoundMixer.stopAll();
mySound3.play();
}
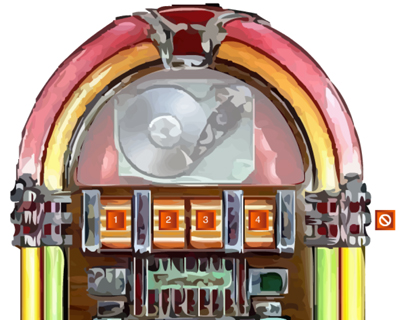
Create the graphics you want for the interface. You will need one button for each song you want to play, whether creating this using ActionScript 2 or ActionScript 3.
CONTROLLING VOLUME
Most site designers are eager to include music in their design. While site design critics and professionals often caution against it, one way to include it without offending is to create sound controls. The process is lengthy, but not difficult. And if you want music in a Flash site, you definitely want to include the option for adjusting the volume, or turning the music off all together.
USING AS2
First you're going to need some symbols:
- A play button
- A stop button
- A button/movie clip for the volume control
- A graphic to represent the volume
Start by taking some time to sketch out different design options for these pieces: as a group, they need to be visually integrated.
Start with a new Flash file set to ActionScript 2.0
Import the sound to the Library, highlight it (Control-click / right-click) and select Properties. Open the Advanced options, if they are not already showing, and check the Export for ActionScript option; Export in first frame will become checked automatically.
The Identifier field should already contain the name of your sound file: if it doesn't, add one (short and simple! We're using MySound). You can call this anything you want and remember that single word names are smarter—do not use spaces! Click OK.
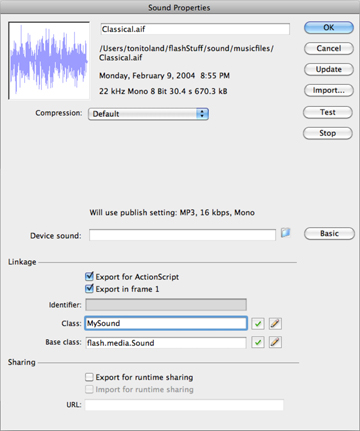
Flash will import the Base class for you, and you set the Class name yourself. It must start with a capital letter. Click OK when Flash tells you it's going to create this class for you.
Create and name four more layers; one for the buttons, one for the volume slider, one for frame labels, and one for actions.
Add an ending frame (F5) in all layers in frame 2 of the timeline; you'll be using the extra frames to toggle between the on button and off buttons. This needs to be a plain frame, not a keyframe!
NOTE: If you want to use this sound control in another movie, you'll need to turn it into a movie clip symbol when you're finished, otherwise the on/off switch you're going to create will mess up any animation in the main timeline.
Create a volume graphic, note the width of it, and then lock that layer.
Create play and stop button symbols. Place the play button in the first frame of the button layer. Leave the stop button in the Library for now.


Create start and stop buttons, and graphics for the volume slider. Keep things organized on separate layers. The play and stop button are placed in the same position on two separate keyframes to create the illusion that they are the same button.
Select frame 2 of the button layer and insert a keyframe. Delete the play button instance and place the stop button in frame 2. Use onion skinning to make sure the play and stop buttons are aligned on top of each other.
In the labels layer, label frame 1 "play" in the properties Inspector, and frame 2 "stop" (you'll have to add a keyframe in frame 2 of the labels layer before you can label it).
In the Actions layer, place a stop action in frame 1. Add a keyframe to frame two and add a second stop action there, too.
Highlight frame 1 and select the play button on the stage. Use the ActionScript panel to add this script:
on(release){
_root.mySound.start(0,1000);
_root.gotoAndStop("stop")
}
This tells Flash to move to frame 2 (which you labeled "stop"), where your stop button will reside, and stop moving through the timeline: it won't stop the song from playing, however.
Select the stop button on the stage in frame 2 and add this code in the Actions pane:
on(release){
_root.mySound.stop();
_root.gotoAndStop("play")
}
This code tells Flash that when the stop button is pressed, it should go to the frame labeled "play" and stop.
The next step creates the code needed to start and stop the actual sound. This occurs in the first frame of the actions layer.
Make sure the first frame is selected in the actions layer, and add this code to the Actions pane:
stop();
var mySound:Sound = new Sound();
mySound.attachSound("identifiernameyouused");
Replace "identifiernameyouused" with the linkage name of your sound, with quotes.
This code first defines a variable called mySound and then defines what library object should be considered: ("identifiernameyouused").
Next, we need to create and script the volume controller. Follow these steps very carefully!
Highlight the volume slider layer and create the graphic you want to use for this piece; this is what the user will click and drag to adjust the volume. Make sure it's positioned at the left side of the volume graphic.
Select the entire graphic (don't leave the stroke unselected, for instance) and make it into a button symbol (F8). Call it slider_btn.
While it's still selected on the stage, add this code to the Actions pane (remember the button must be selected on the stage):
on (press) {
startDrag(this, false, left, top, right, bottom);
}
on (release) {
stopDrag();
}
Keep the button selected on the stage, and press F8 again. This time, choose Movie Clip for type. Call it slider_mc.
This places an instance of the slider_btn inside a movie clip symbol called slider_mc.

This timeline has been exaggerated to show the frame labels. Technically, you only need 2 keyframes.
While this new movie clip is selected on the stage, add this code to the Actions pane:
onClipEvent (load) {
top = _y;
bottom = _y;
left = _x;
right = _x+100;
_x += 100;
}
onClipEvent (enterFrame) {
_parent.mySound.setVolume(_x-left);
}
Note that the numbers you add here define the distance you can move the slider from right to left. Measure the slider bar graphic to determine the number to use. The slider starts out at full volume, all the way to the right. You may need to move it around so it aligns with the volume graphic you've created.
If you want a vertical volume slider, use this code instead:
onClipEvent(load) {
top=_y;
bottom=_y+100;
left=_x;
right=_x;
y+=10
}
onClipEvent(enterFrame) {
_parent.my_sound.setVolume(_y-bottom);
}
Note in this code that we are working with the Y axis, rather than the X axis.
One last detail: in both frames 1 and 2, make sure to add stop actions on the actions layer to keep the movie from flipping back and forth between them. Neglecting to do that will create a weird flutter of the start and stop buttons.
Save and test your movie.
Believe it or not, that's all there is to it! A lot of coding, yes, but you can use this simple bit over and over, making it look different each time by merely editing the graphics/symbols, and changing the song by importing and linking new ones.
Do remember that this is most appropriate for a stand-alone sort of player. Since it uses frames to display a start and stop button that appear to be the same button, it won't work if you have animation or interaction on your timeline; the stop actions in the first two frames will prevent things from playing properly .
Select all the frames in all the layers and copy them (Option-click / right-click to copy frames). Create a new movie clip symbol, and paste the frames. Use this movie clip wherever you want to play and stop music, and adjust the volume as well. Just remember to change the sound Identifier in the code to work with whatever sound file you import and link to a new movie.
CONTROLLING VOLUME AS3
Create a button symbol to use as a trigger for the volume control. There are a couple of ways to go about this, just keep in mind, you will need multiple instances of it so the adjustment is smooth.
One way:
Create a button that will control the volume; use multiple instances of this button either horizontally, or vertically, to create a volume "slider" of sorts. In this example, the Alpha of each button instance was adjusted to create a visual indication of the volume level (along with adding some captions, just in case). You might use the Tint option to shade each button with a different color, instead, or leave them alone entirely).
Another way:
Create an invisible button (one with no up, over or down state—just a rectangle in the hit state).
On the stage, design a volume graphic, and then place between 5-10 instances of the invisible button on top of it, giving each button an instance name in the Properties panel. The buttons should be touching.
Once you've decided on a visual approach and have 5-10 buttons on the stage, make sure each button has a unique instance name in the Properties panel.
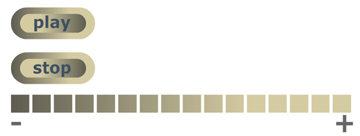
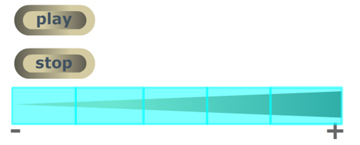
Use actual buttons with instance names to control the volume, or create invisible buttons for a more fluid appearance.
Highlight the first frame of the actions layer and add this just below any code you may already have:
var volControl:SoundTransform = new SoundTransform();
function vol5(event:MouseEvent): void {
volControl.volume = 1;
sndControl.soundTransform = volControl;
}
function vol4(event:MouseEvent): void {
volControl.volume = .7;
sndControl.soundTransform = volControl;
}
function vol3(event:MouseEvent): void {
volControl.volume = .5;
sndControl.soundTransform = volControl;
}
function vol2(event:MouseEvent): void {
volControl.volume = .3;
sndControl.soundTransform = volControl;
}
function vol1(event:MouseEvent): void {
volControl.volume = .1;
sndControl.soundTransform = volControl;
}
We started by defining a new variable to control the sound, using the SoundTransform property, and then defined a function for each level of sound, from full volume (vol5) to very soft (vol1). Note that Flash uses 1 as 100% volume, and .1 as the quietest level, or about 10% of the full volume.
The button code is added after:
vol1Btn.addEventListener(MouseEvent.MOUSE_OVER, vol1);
vol2Btn.addEventListener(MouseEvent.MOUSE_OVER, vol2);
vol3Btn.addEventListener(MouseEvent.MOUSE_OVER, vol3);
vol4Btn.addEventListener(MouseEvent.MOUSE_OVER, vol4);
vol5Btn.addEventListener(MouseEvent.MOUSE_OVER, vol5);
Change the button names to reflect the ones you used.
Save your movie and test it.
It might be nice to add an actual slider graphic, so people know they can click and drag it along the volume bar. We'll also add a pause button.
Start with a new AS3 file.
Create a start, pause and stop button.
Give these buttons instance names (we're using play_btn, pause_btn, and stop_btn for this exercise).
Arrange them so the start and pause buttons are on top of each other, and the stop botton off to the side, or top or bottom.
Create a graphic to represent the volume (a line, for instance).
Select that graphic and press F8 to turn it into a movie clip, then double-click it to get into edit mode.
On a second layer in the movie clip, create a movie clip symbol that will be used as the slider that adjusts the volume. Draw the graphic, select it, press F8, and select movie clip for Type.
Place the registration point in the center.
Give this movie clip an instance name of slider_mc.
Go back to the main timeline, select the movie clip you were just working on, and give it an instance name of volume_mc.


Place the play and pause buttons on top of each other, because the code will hide and show them, depending on user behavior.
Finally, add an actions layer and add this code to the Actions pane:
var soundReq:URLRequest=new URLRequest("keyboard.mp3");
var sound:Sound = new Sound ();
var soundControl:SoundChannel = new SoundChannel();
var isPlaying:Boolean = false;
var resumeTime:Number=0;
sound.load(soundReq);
sound.addEventListener(Event.COMPLETE, onComplete);
function onComplete(event:Event):void {
play_btn.addEventListener(MouseEvent.CLICK, playSound);
stop_btn.addEventListener(MouseEvent.CLICK, stopSound);
}
function playSound(event:MouseEvent):void {
soundControl=sound.play(resumeTime);
pause_btn.visible=true;
pause_btn.addEventListener(MouseEvent.CLICK, pauseSound);
play_btn.visible=false;
play_btn.removeEventListener(MouseEvent.CLICK, playSound);
}
function pauseSound(event:MouseEvent):void {
resumeTime=soundControl.position;
soundControl.stop();
play_btn.visible=true;
play_btn.addEventListener(MouseEvent.CLICK, playSound);
pause_btn.visible=false;
pause_btn.removeEventListener(MouseEvent.CLICK,pauseSound);
}
function stopSound(event:MouseEvent):void {
soundControl.stop();
play_btn.visible=true;
play_btn.addEventListener(MouseEvent.CLICK, playSound);
pause_btn.visible=false;
pause_btn.removeEventListener(MouseEvent.CLICK,pauseSound);
pause_btn.visible=false;
var dragging:Boolean=false;
var rectangle:Rectangle=new Rectangle(0,0,300,0);
function dragIt(event:Event):void {
volume_mc.slider_mc.startDrag(false, rectangle);
dragging=true;
volume_mc.slider_mc.addEventListener(Event.ENTER_FRAME, adjustVolume);
}
function dropIt(event:Event):void {
if (dragging) {
volume_mc.slider_mc.stopDrag();
dragging=false;
}
}
function adjustVolume(event:Event):void {
var vol:Number=volume_mc.slider_mc.x/100;
var soundVol:SoundTransform=new SoundTransform(vol);
soundControl.soundTransform=soundVol;
}
}
volume_mc.slider_mc.addEventListener(MouseEvent.MOUSE_DOWN, dragIt);
stage.addEventListener(MouseEvent.MOUSE_UP, dropIt);
Save the movie and test it. Pretty cool :-)
Take some time now to look at that code. See if you can determine how it works. Remember that the basic structure of button code includes defining variables, writing functions, and then assigning those functions to buttons using event listeners.
YOUR TURN
Design a fun interface and code buttons that play (at least) three external MP3 files. Please make sure to credit your music sources appropriately.
Place the FLA, and the MP3s in a folder, zip it, and upload it to Documents.
Publish your file, and edit the HTML document to center the SWF on the page, add an appropriate page title, and your copyright information.
Upload the HTML, SWF, and MP3 files to your web space; update your homepage links, and upload the revised SWF for your homepage.