SYMBOLS + ANIMATION
There are three different types of symbols you can create and reuse in Flash; movie clips, buttons, and graphics.
Let's take a closer look at each type, and the pros and cons of each.
movie clip symbols
Movie clip symbols are, perhaps, the most versatile symbols.
They have an internal timeline, so you can add animation within the symbol, or it might only be one frame long, with no animation.
If you want a movie clip to loop (play over and over again without stopping) they will play indefinitely. You can also add ActionScript code to have them play only once. Or, play only if the user presses a button.
You can create a movie clip from elements you've created and organized on the main timeline, or start from scratch.
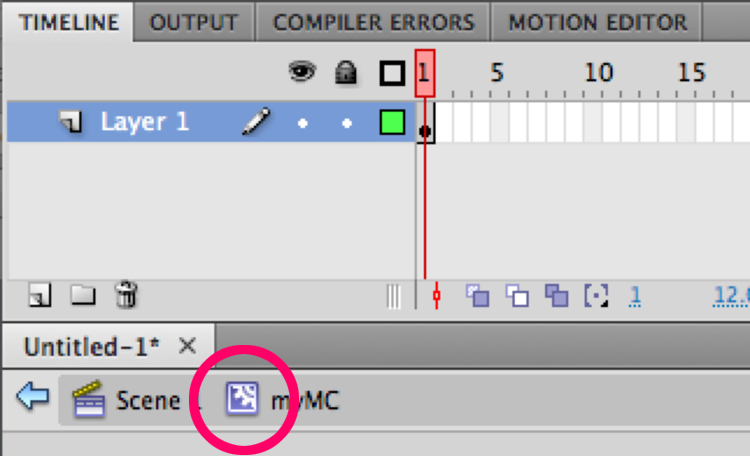
The key piece to getting a movie clip symbol to work is to understand where you are in the hierarchy of the Flash interface.
Anything on the stage of the main timeline is what you see when you test your movie, and what the user sees when you upload the published HTML and SWF files to your web site. Once you start creating and editing movie clip symbols, you'll be inside the symbol's timeline, or one step "down" from the main timeline.
When you are working within a symbol, you'll note that the timeline indicates a "breadcrumb" trail between the main timeline and where you are working in relationship to that. To exit symbol editing mode, click on the Scene 1 icon, or the left-pointing arrow. It's important to recognize where you are in Flash's interface to ensure you are placing animation and code in the correct place in order for it to work.
Once you've created a symbol, it will be placed in the Library. Access the Library using the Window menu, if it isn't already open.
Symbols have their own timeline, so you need to be aware of where you are in relation to the main timeline, which is your actual movie.
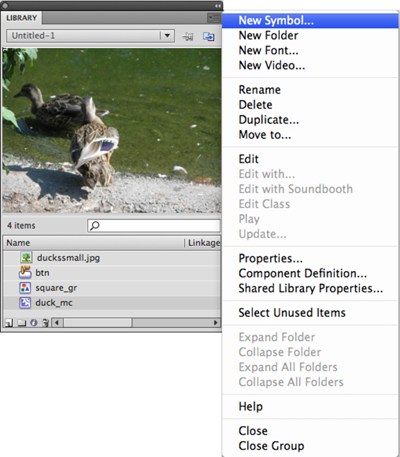
Anything you import, or make into a symbol, will appear in the Library. Remember to turn anything you want to animate into a movie clip symbol first.
The Library is where symbols and imported elements are stored. Note the different icons that represent them (previous page). The Library's flyout menu allows you to create new symbols from scratch, organize your symbols into folders, rename, delete, and duplicate symbols, and even change their type.
A symbol is a reusable element; the actual code that creates it lives in the Library, and when you use it in your Flash movie, you are using an "instance" of that original—a reference to the original, rather than the original itself. It's for this reason that using, and reusing, symbols can keep your FLA file a manageable size.
This isn't without some compromise, however. Whenever you make a change to the original symbol (by double-clicking it on the stage, or on the symbol's icon in the Library) you will be altering all the instances of it within your movie as well.
Making changes to an instance of a symbol using the transform tool or the Properties panel will only change that instance, and not the original symbol in the Library.
Movie clip symbols have a timeline of their own, as you can see from the illustration on the previous page. This means you can actually use other symbols and animate them, or add coded button instances, within another symbol.
If a movie clip symbol has animation in it, it will loop—play over and over—unless you add code somewhere to make it stop. An animated movie clip symbol can also be coded not to play at all unless the user does something specific, like press a button.
The key concept here is that in order to animate anything using a Motion tween, or a Classic tween, it MUST be a symbol first (typically a graphic or movie clip).
BUTTON SYMBOLS
A button symbol only has four frames in its internal timeline.
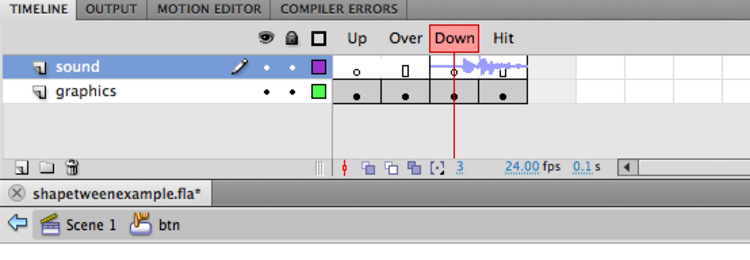
When you are designing a button symbol, you have the opportunity to create different graphics in each of the three visible states: Up, Over, and Down. The Hit state should be a solid shape that creates the active area (or hot spot) that indicates where the user can press the button to make something happen. Note, too, that we are in symbol editing mode, per the "breadcrumb" indication below the frames
If you want to add sound to a button, first, make sure it is a short one! Best practice is to add a layer to the button's timeline, place a blank keyframe (F7) in the Over or Down state, and then add your sound to that frame by dragging it from the library to the stage.
Adding sound to the hit state will play once the user has released the button, whereas placing it on the down frame will play it as the user presses the mouse button. Putting it on the over state will play the sound whenever the user mouses over the button—that can be fun for a while, but ultimately gets annoying.
Sounds added to buttons are set to Event type for sync, and will play until they are complete. That means, if you use a long sound and someone presses the button several times, the sound could start playing over itself—not pleasant. See the section on Sound for the different sound sync settings.
It's also important to remember to include a hit state, especially if text is being used as a button symbol; if you forget a solid shape for the hit state, the user's cursor will flicker between an arrow, and a finger— very annoying.
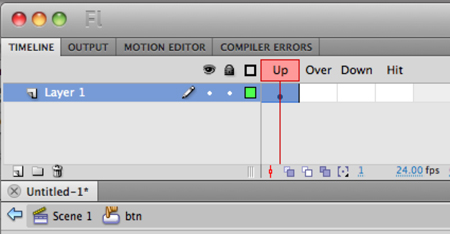
A button symbol's timeline only uses 4 frames—one for each "state." States represent what it looks like initially (up), as a user mouses over it (over), and what it looks like when pressed (down). The hit state should always be a solid shape to trigger the finger icon as someone mouses over the button itself.
A button won't do anything (except change what it looks like, depending on the graphics in each of the three visible keyframes) unless it's coded using ActionScript. There are two ways to do that; one is to select the actual button instance on the stage, and place the code in the Actions pane (AS1), or to name the button instance, and place the code on a frame (AS2 or AS3); the code must include the instance name you used.
Placing code directly on the button symbol is ActionScript 1. Referring to an instance name in frame code is ActionScript 2, or ActionScript 3. It's important to recognize the difference.
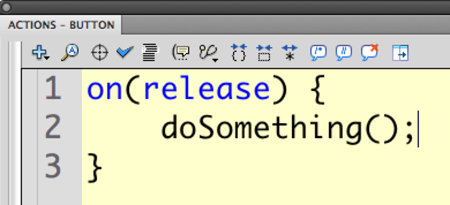
When using ActionScript 1, you must select the button instance on the stage, then open the Actions panel to add code; note that the actions panel tab says ACTIONS-BUTTON. If it doesn't say that, you aren't adding the code where you want it. Button code always starts with what the user has to do (in blue) followed by what you want Flash to do, which is enclosed in { } curly braces. (Note that "dosomething()" is not official ActionScript ;-))
When using ActionScript 2, you must name a button instance in the Properties panel, then target a keyframe in the timeline. The Actions pane will say ACTIONS-FRAME. You then use the instance name in the code so Flash knows what user action is required on the symbol, and then what to do about it. (Again, the "dosomething" is for illustration purposes only, and not real ActionScript.))
If you are using AS3, the code is a bit more complicated, and is covered in more detail next.
AS 1 version:
When using AS1, simply select the button on the stage, open the Actions pane and tell Flash what you want it to do when someone presses and releases the mouse button.
Select the button symbol that you want to use as a link to another project or web page. To make sure it's selected on the stage, deselect everything first, then click on it.
Open the Actions panel and add this code:
on(release) {
getURL("http://yoursitename/foldername/filename.html");
}
Save and publish the FLA, and upload the new SWF and HTML files to your web site.
AS 2 version:
Select the button symbol that you want to use as a link to another project—make sure it's selected on the stage—and give it an instance name in the Properties pane.
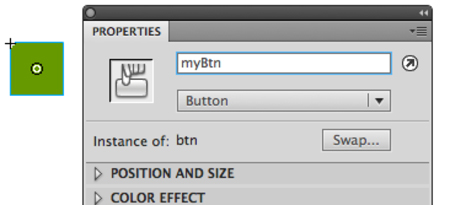
Select the button symbol on the stage, then type an instance name for it in the Properties panel.
Highlight the first frame in the actions layer, open the Actions panel and add this code:
btnName.onRelease = function() {
getURL("http://yoursitename/foldername/filename.html");
}
Save and publish the FLA, and upload the new SWF and HTML files to your remote site.
AS 3 version:
Select the button symbol you want to use as a link—make sure it's selected on the stage—and give it an instance name in the Properties pane (urlBtn, in this example).
Highlight the first frame in the actions layer of the timeline, then open the Actions pane and add this code (make sure the Actions pane says ACTIONS-FRAME):
var link1:URLRequest = new URLRequest("http://yoursitename/foldername/filename.html");
urlBtn.addEventListener(MouseEvent.CLICK, urlBtnClick);
function urlBtnClick(event:MouseEvent):void {
navigateToURL(link1)
}
NOTE: replace yoursitename with YOUR domain name, foldername with the name of the folder where you have placed the file you want to link to, and filename with the actual HTML file name.
A graphic symbol has a timeline of its own, just like a movie clip symbol. The difference between the two is primarily how it will be used in a Flash movie. While you can certainly include animation within a graphic symbol, they are more typically used for still objects (an imported bitmap, for instance).
ADDING SOUND TO BUTTONS
Create a button symbol from scratch (Insert > New Symbol (Command F8 / Ctrl F8), or select a button graphic you've created on the stage and turn it into a symbol (Modify > Convert to Symbol, or F8).
If you already converted an existing object into a button symbol, double-click the symbol on the stage to get into symbol editing mode.
Click in the Over frame of the button timeline; press F6 if you want to modify the graphic in the Up state, or F7 if you want to create a totally new Over state graphic.
Repeat step 3 for the Down state.
Add a Hit state that covers the graphics in the other states.
Add a new layer to the button symbol timeline; name it sound or SFX—something descriptive.
Import the short sound you want to use (it should be no longer than 3 or 4 10ths of a second).
Place a blank keyframe (F7) in the button state where you want the sound to occur; Over, Down, or Hit. Make sure that frame is selected (the red playhead is over it).
Drag the sound from the library to the stage.
Import the sound file you want to use (make sure it's very short!) and add a new layer inside the button symbol. Place an empty keyframe (F7) where you want the sound to play. then while that frame is highighted, drag the sound from the library to the stage.
Check the Properties panel to make sure the Sync is set to Event.
Exit symbol editing mode and place an instance of the button on the stage if there wasn't one there already.
Test your movie (Command Return / Ctrl Enter)!
NOTE: It is tempting to turn on Enable Simple Buttons from the Control menu. Be cautioned that doing so will make it impossible to add code to the button later on—unless you turn it off again. Better to use the test movie keystroke shortcut to test buttons (Command Return / Ctrl Enter). It's faster and easier, and it will be less confusing in the long run!
GRAPHIC SYMBOLS
A graphic symbol has a timeline of its own, just like a movie clip symbol. The difference between the two is primarily how it will be used in a Flash movie. While you can certainly include animation within a graphic symbol, they are more typically used for still objects (an imported bitmap, for instance).
When creating a graphic symbol that has more than one frame, you must remember to include the same number of frames (or a multiple of that number) on the timeline or the symbol won't play in its entirety.
Another advantage to using animated graphic symbols is that you can tell Flash when to start the animation. For instance, if you had a twinkling star as an animated graphic symbol, you could use multiple instances of it on the main stage and have each one start on a different frame within the symbol, thus creating the illusion that they were all twinkling at a different rate.
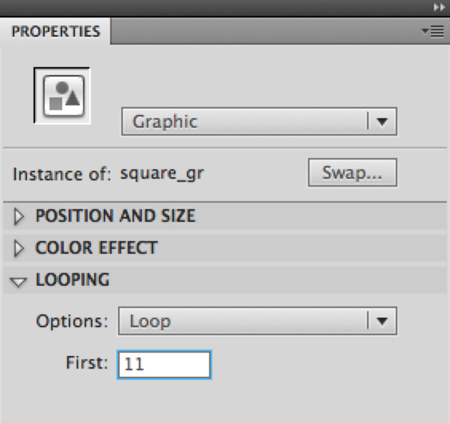
Multiple instances of graphic symbols can loop at different rates. Use the Properties panel to determine at which frame (inside the graphic symbol's timeline) each instance starts.
ANIMATING SYMBOLS
The Flash timeline consists of frames, each one representing a moment in time. At the default frame rate of 24 frames per second (fps), each square represents 1/24th of a second; 24 frames equals one second of animation. Change occurs between key frames within the timeline. New with CS4 are Property keyframes where change can occur as well. What happens in between key frames (keyframes) or a keyframe and a property keyframe is called a tween.
Before you can make something change over time, it must be a symbol. While you could transform a button, it's typically a movie clip symbol (mc) or graphic symbol (gr) that is used at the beginning and the end of an animation or transformation.
To make an animation that loops seamlessly—that is, it appears to go on forever—the starting and ending frames must be identical. That can occur in two ways. In the first, the symbol instance that's moving starts in one place, moves to another, and then moves back to its starting position. The second way is to have a symbol that is twice as wide, or twice as tall, as the stage, which allows it to move continuously in one direction (rather than back and forth).

To have something scroll forever, make it twice as wide, and identical from side to side (or twice as tall, and identical top and bottom).
You can create a scrolling object that moves seemingly forever by using a symbol that is twice as wide as the stage, and identical left and right, or twice as high and identical top and bottom.
The steps to create a motion tween are quite simple:
1. Create a symbol in the first frame of a layer (you can only have one symbol per layer if you are going to animate it), If you are drawing directly in Flash, be sure to select everything you want included in the symbol before pressing F8, or weird things will happen.
2. Add time to the timeline: press F5 in a frame some distance away from the first frame—remember that 24 frames equals 1 second, unless you change the frame rate.
3. Add the motion tween (Option-click/right-click and select Create Motion Tween).
4. Highlight the ending frame by moving the playhead to that frame.
5. Move the symbol on the stage to its ending position. You will get a small diamond shape, indicating something changed between the keyframe symbol and the property keyframe.
That's all there is to it!
You may have noticed the option (dimmed, perhaps) to add a "Classic Tween." Prior to Flash CS4, to make a motion tween, you would create a beginning keyframe, and an ending keyframe, and then create change in one or the other. CS4 has eliminated the need for the ending keyframe, which simplifies things a lot; you no longer have to remember to make sure an instance of the same symbol is in the final keyframe, as Flash takes care of that for you. I prefer classic tweens when I'm working, but either approach is fine.
If you want something to move back and forth using a motion tween, here's a trick to try:
1. Create a symbol in the first keyframe of a layer.
2. Add time to the timeline (F5).
3. Add the motion tween (Control-click / right-click and select Add Motion Tween).
4. Move the scrubber bar to the ending frame and move your symbol using the arrow keys—just one click on an arrow—then reverse that move using the opposite arrow, which positions your symbol right were it was originally.
5. Highlight a frame between these two, and move your symbol.
You may need to tweak the position of the end symbol a bit to get rid of the small hiccup (hesitation) when it loops again.
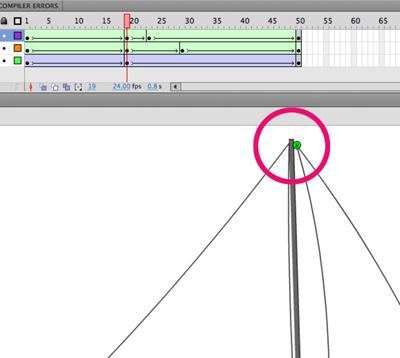
A Motion tween allows you to bend the path between keyframes using the Selection tool, creating, in essence, a motion guide. Very nice.
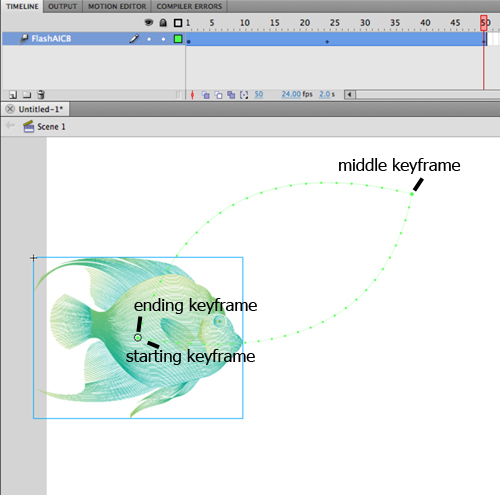
Start and end the position of a symbol in the same place, and change it in the middle to create a loop. Bend the path between keyframes using the Selection tool.
An animated movie clip is created the exact same way you would do it on the main timeline; just create a new movie clip symbol first (Command F8/Ctrl F8). You will enter symbol edit mode, where you can begin to construct the animation.
If you've already created the animation on the main timeline and want to convert it to a movie clip symbol, follow these steps:
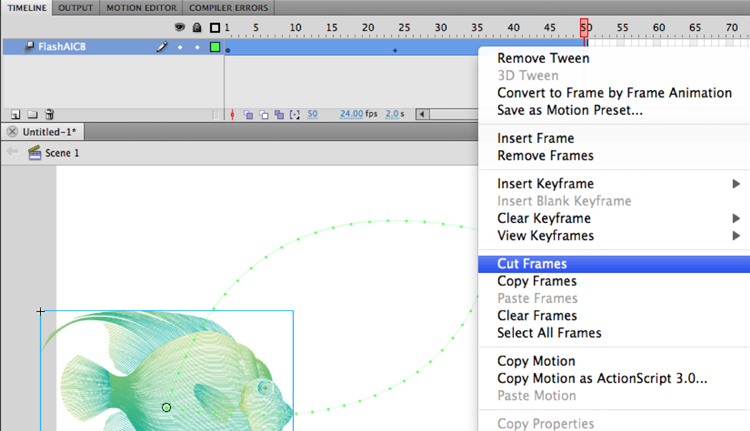
1. Click and drag through all the frames on all the layers you want to include in the movie clip symbol. Be brave! Click and drag in one movement. If you click, then click and drag, you will be moving the frame(s) rather than selecting them.
2. Control-click/right-click the selected area and choose "Cut Frames." Scary, but not to worry!
3. Press Command F8/Ctrl F8 to create a new movie clip symbol, name the symbol and select Movie Clip for Type. Clicking OK places you symbol edit mode, with an empty stage, and one layer.
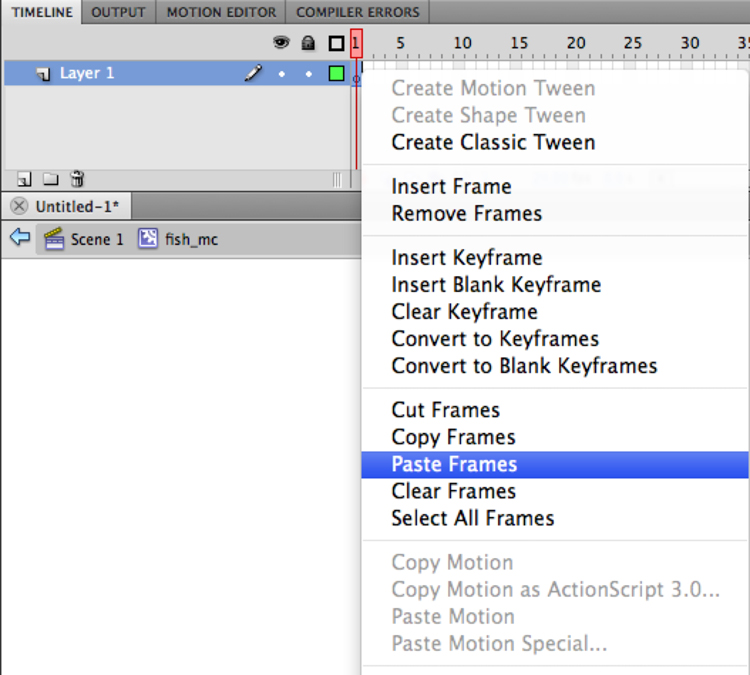
4. Control-click/right-click in the first frame of the only layer and select "Paste Frames." Voila!
The best part is, if you named the layers, symbol instances and/or frames, Flash remembers that. It will also include any code you may have on a symbol or keyframe. Nice!
5. Exit editing mode, and drag an instance of the new symbol on to the stage so you can view it using Control > Test Movie (Command return/Ctrl Enter).
You can also drag animated symbols from the Library into a movie clip symbol's timeline—a rotating wheel added to a moving wagon, for instance.
NOTE: Flash only previews animation in a movie clip when the movie is tested (Command Return / Ctrl Enter).
Select the layer(s) on the main timeline you want to turn into a symbol and option-click / right-click to cut the frames. Create a new movie clip symbol (command F8 / ctrl F8) and then option-click / right-click to paste the frames in the new symbol's timeline. Drag this new symbol from the Library to the stage in the main timeline to create a looping animation.
SHAPE TWEENS
Shape tweening is simply morphing one shape into another. The shapes you use cannot be symbols but need to be either object drawings or merge drawings.
The process is simple.
Create a shape in the first frame of a layer (warning; adding strokes to a shape you want to morph can create issues! Try using solid shapes with no outline to start, or place the stroke on its own layer).
Add time to the timeline; go out several frames and press F6 to add a keyframe for the ending shape.
Create a new shape, or modify the existing one, in the final keyframe.
Control click / right click in between the two keyframes and select Create Shape Tween.
You can test the result by pressing Return/Enter, or using Control > Test Movie (Command Return / Ctrl Enter).
If the results aren't exactly as you anticipated there are a couple of things you can try:
1. add additional keyframes in between the start and end and edit the shape at that point.
2. use shape hints
Go back to frame one and turn on onion skinning. Extend the gray bar all the way to the end of your movie. You should be able to see both shapes.
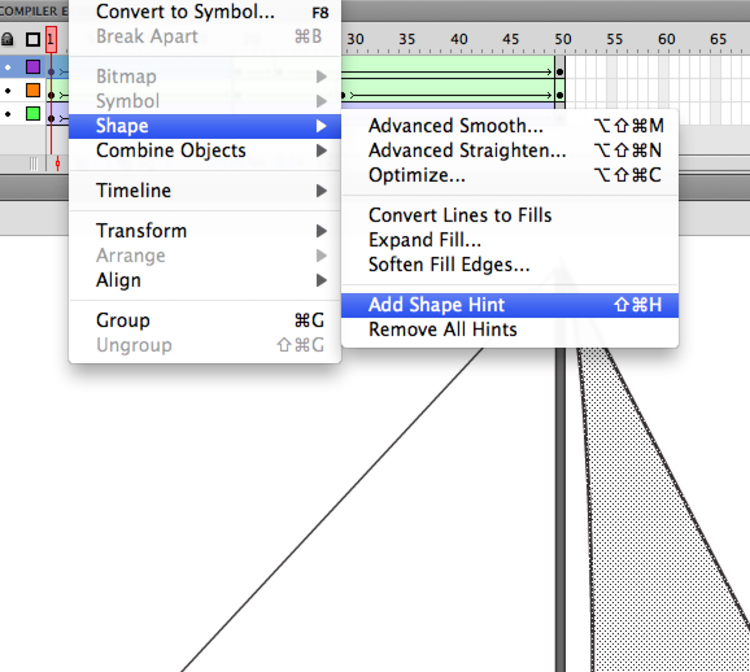
While you're still in frame one, use Modify -> Shape -> Add Shape Hint. Move this red letter to a point on the shape that you want to remain constant.
Click on the last frame and move the "a" shape hint to a parallel point on the ending image.
That is, if you place the hint in the first frame at the top right, you probably want to place it at the top right in the ending keyframe as well.
Repeat this process to add shape hints. Note: if you don't coordinate your letters—that is, place the "a" in the upper left, the "b" in the upper right and so on, very weird things happen!
You can add as many hints as you need—they will be lettered a, b, c, and so on. Remember to test the movie between each addition, as shape tweening takes up a lot of memory, and the more efficient you can be, the smaller your file size.
If you want outlines for any shapes, place them on a separate layer. That way, Flash knows to tween the outline separately from the fill. For that matter, place every object you want to morph on its own layer; the fewer items per layer that are being tweened, the more likely Flash is to get it right!
Shape tweening can get messy, so use it sparingly, if at all.
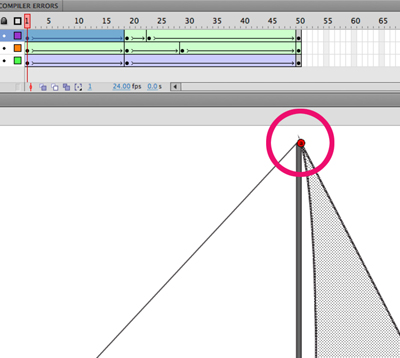
Add shape hints in the initial keyframe, then move them where you want to keep a shape consistent in the first and last keyframes.
FRAME X FRAME ANIMATION
There is one more way to make something move in Flash: frame by frame animation.
This is exactly how the original animated cartoons were created: one frame at a time.
Most of Disney's original animations, along with those created by Terrytoons and other animation houses up until recently, were all done using this time- and talent-intensive process.
Controlling animation by determining what happens in each frame of a movie is time consuming, but ultimately provides total control over the results. Flash's programming is only used as a means to play through the frames, rather than creating tweens based on keyframes spaced some distance apart.
Backgrounds can still be developed using motion tweens—you can use any or all of the tweening options in a single animation.
In any case, you can use frame by frame animation to create more realistic movement for someone walking or running, for instance, or to approximate the 3D nature of a face turning from left to right; you would need to create a drawing of each stage, and place them in their own keyframes across the timeline. As with shape tweening, there are times when this is the best option for quality results.
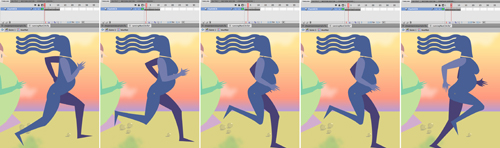
In frame by frame (or "straight ahead") animation, the actual drawing changes from one frame to the next to create motion.
YOUR TURN
Create a simple animation that loops seamlessly; it can be a boat sailing across a sea with billowing clouds above, or a spaceship cruising the universe. Use your imagination; creativity counts! Make sure there are at least four moving elements.
You must draw the symbols in Flash, or copy and paste them from Illustrator. You may not use photographs, or anything created in Photoshop.
Publish the file, and edit the HTML document to center the SWF on the page, add an appropriate page title, and your copyright information (hint: add a div tag around the SWF and create a CSS rule to center things).
Upload the HTML and SWF files to your web space; update your index.fla links, and upload the revised SWF .
Name your FLA file lastname_animation.fla and upload the FLA file in the assignments area of Blackboard.