TYPE
You may have noticed, when messing around with Flash's Text tool, that there are three different types of text in Flash. Unless you add code to deal with them, however, they don't look any different than straight forward static text, which is what you should have been using up until now.
STATIC text is what you use when you just want your viewer to read what you have to say. Like text created using HTML code, within <p> tags, it pretty much just sits there looking nice (we hope!). The good news is that you can use any font you want in Flash as it's embedded in the SWF file when you publish it.
There are two ways to create static text:
Use the text tool to drag a text box that defines the margins, left and right. You will only be able to drag a box that's one line tall, but as you type in it, it will expand to accommodate everything, wrapping the text automatically as you go.
Change the dimensions of the textbox by using the text tool to click and drag the small rectangle at the top right corner; Flash will rewrap the text to fit.
This type of text box is called "defined" as that's what you've done—defined the size and position of the text field.

Use the text tool to reshape the textbox; click and drag the small rectangle at the top right.
Use the text tool to reshape the textbox; click and drag the small rectangle at the top right.
The second way to create static text is to simply click on the stage with the text tool and type. Just like Illustrator, when you work this way, you need to use hard returns to break the text into multiple lines. This is referred to as "extending" text since the type extends to the right until you enter a return for a new line.

You can easily reformat the textbox dimension by clicking and dragging the circle, using your text tool. This changes the type of text box from extending to defined, and the symbol changes from a circle to a square.
You can easily reformat the textbox dimension by clicking and dragging the circle, using your text tool. This changes the type of text box from extending to defined, and the symbol changes from a circle to a square.
In either case, static type is what you want to use for text that will not change; bodycopy, captions, button labels, and so on. The user cannot select or modify it in any way. And, as I mentioned, you are not restricted to using fonts the user has on her/his machine; Flash embeds the fonts when the SWF is published.
If you have a substantial amount of text, you might want to consider using "device fonts." As you might surmise, these are generic fonts (fixed-width (_typewriter), serif (_serif), or sans serif (_sans) ) that most people have installed on their machines; Courier, Times, Verdana or Helvetica—fonts similar to those used in straight HTML coding.
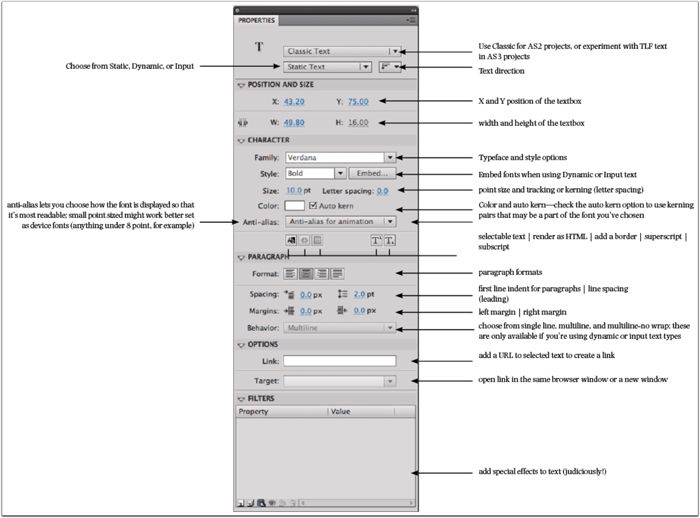
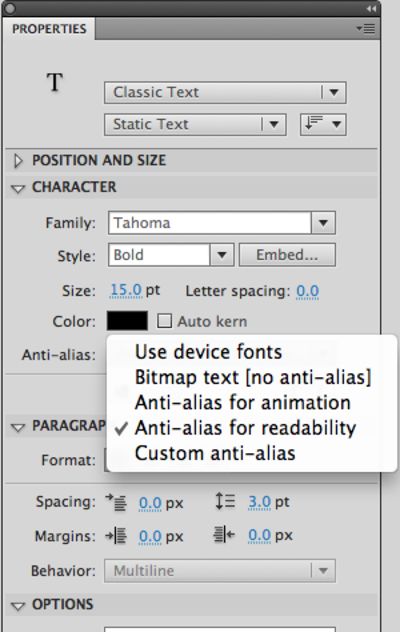
Under the Character option is a dropdown menu that allows you to choose from several text display options.
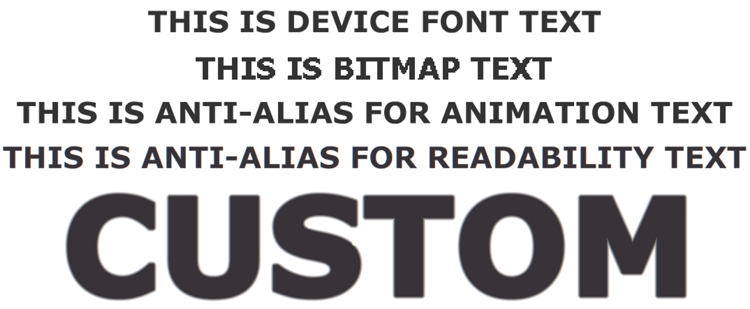
Use device fonts: Select this option to save on file size. If the font choice you've made is fairly generic (a basic sans serif font like Helvetica, Arial, or Verdana, or a basic serif font like Times Roman) selecting Use device fonts will not embed the font in the SWF when you publish your file. Instead, it includes information about whether to display a serif or sans serif font, with no specific font name. The user's browser and OS will substitute the _sans or _serif options with the font preferences set by the user. Device fonts are useful for smaller point sizes as well. Be aware that due to the whims of individual tastes, the type in your project will look different on just about any machine on which you view it.
Bitmap text [no anti-alias]: This choice can also save on file size as Flash doesn't generate the font outlines when the SWF is published. It's also pretty ugly, as it's composed of pixels, rather than using vector-based shapes.
The two anti-alias options are fairly straightforward. If type will be moving or transforming in any way, use the animation option. If it's going to be static, select readability.
The custom option allows you to alter the thickness of the anti-aliased edge, along with the sharpness. In the example above, the edge was set to 200, and the sharpness to -400. As you can see, that's pretty fuzzy, however, you have a lot more control over your text using this option. Test the SWF on several different machines and OSs to make sure it displays the way you want it to. As you start to explore the Properties panel when type is being used, you'll notice many options that echo those you are familiar with in Illustrator and InDesign; you can track and kern text (always do that when your type is 16 points or larger!), determine leading or line spacing, font and point size of course, color, margins, first line indents, and so on.
If you have a whole lot of text in your Flash file, you might want to consider using Device fonts.
INPUT TEXT is used when your Flash application requires user information, or input, in order to display something the user is interested in: to have a user log in to a site, or find out their preferences for instance.
Creating input text is very simple; just click and drag with the text tool, and then set the text type to Input in the Properties panel. It's what you can do with it through the use of actions, that makes it a lot more interesting.
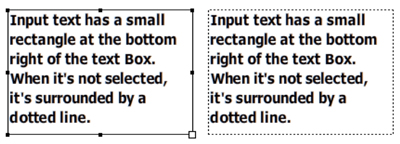
Input text is created the same way as static; either click and drag, or just click and type. Use the text tool to adjust the dimensions of the textbox by dragging the small rectangle at the bottom right.
When input text is not selected on the stage, it has a dotted line around it—watch for that telltale sign to ensure you're using the correct text type. Nothing is worse than using input or dynamic text when you really wanted static, especially when labeling buttons!)
Input text is created the same way as static; either click and drag, or just click and type. Use the text tool to adjust the dimensions of the textbox by dragging the small rectangle at the bottom right.
DYNAMIC TEXT is what you'd use if the content of the text field was going to change. You can use dynamic text fields to update information by loading an external text file. You can also use dynamic text to display user input. We'll deal with that first, as it's fun and pretty easy to do. Do take the time to this now; it's fun and you'll learn some ActionScript 2 tricks!
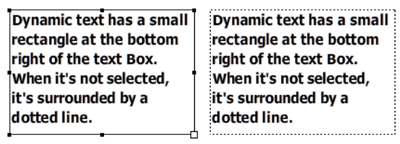
Input text is created the same way as static; either click and drag, or just click and type. Use the text tool to adjust the dimensions of the textbox by dragging the small rectangle at the bottom right.
INPUT + DYNAMIC TEXT USING AS2
Create a new AS2 Flash file.
Create two layers; name one "content" (no quotes), and the other "actions." Lock the actions layer so you don't inadvertently put content on it.
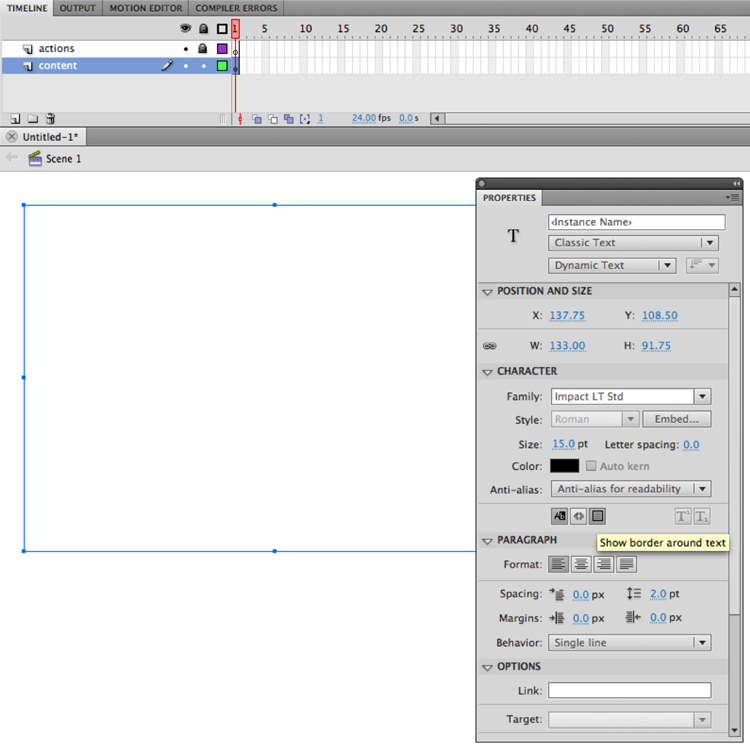
Use the text tool to drag a textbox about 3 inches wide, and set the type to Input text in the Properties panel. Decide on a font, color, and point size for the type. Put a border around it, so the user can see it.
You don't have to put anything in this textbox, or you could add the text "type your name here" (without the quotes, of course) if you want. Adding text in the box means the user will have to delete it first, but it can save the need for a label.
If you don't want to put text in the text box, create a label using Static text that says "type your name here" or something of that sort.
Select the textbox on the stage and give it an instance name of "name_txt" (no quotes) in the Properties panel.
Set the Anti-alias to Anti-alias for Readability.
If you've selected a funky typeface, you should embed the font in the Flash file manually—you may get an automatic warning to embed your font; click OK. If not, click the Character Embedding button in the Properties panel.
Since this is just a quickie example, select just upper and lower case letters for now (hold the Command/Ctrl key to select both if you are using CS4). Note that you can also add specific characters, like % or * by typing them in the field below the other options, if those might be required in the input field.
Click OK.
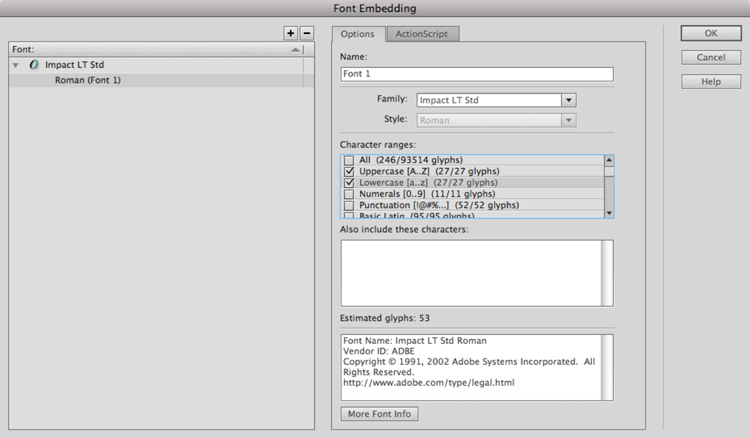
Always embed fonts when using Dynamic and Input text.
Under the Paragraph option, select single line—again, we're creating a mini-example just so you can see how it works. (Note the other options though, like Password, which will give you *** instead of actual characters. Pretty cool.)
Under the Options option, set the max characters to 50, and in the Variable field, type the word "name" (without quotes!).
As you should know by now, a variable is a container that holds information. This text box is now the container for someone's name. You'll need to remember that later, once we hit the ActionScript part of this exercise.
Save and test your movie—type your name in the text field.
OK, that was fun. Now what?
Back on the main timeline, create a smallish box with the rectangle tool, and add the word "submit" —use static text this time!
Select the rectangle and the shape and press F8 and make it into a button symbol.
Give it an instance name of submit_btn in the Properties panel.
Now we're ready to add some interactivity.
Add another layer to the timeline for frame labels—make sure it's under the actions layer.
Select the first frame in the actions layer and open the Actions pane.
Type this code:
stop();
submit_btn.onRelease = function() {
gotoAndStop ("next");
}
The stop action will prevent the movie from playing until the user presses the button. The code referring to the submit_btn instance will move the playhead to a frame labeled "next" when the user releases the mouse.
Move the playhead to frame two and add a blank keyframe to all three layers (F7).
In frame 2 on the content layer, create a new text field, this time setting it to Dynamic text.
Again, make the necessary design decisions to define how you want it to look.
Be sure to select Multiline for the Paragraph Behavior option this time.
While it's selected on the stage, give the dynamic textbox a variable name of "response" (without quotes) in the Properties panel. This will let us refer to the instance name of that field in the ActionScript.
Finally, add a frame label in frame 2 of "next." Highlight the frame first, then add the name in the Properties panel.
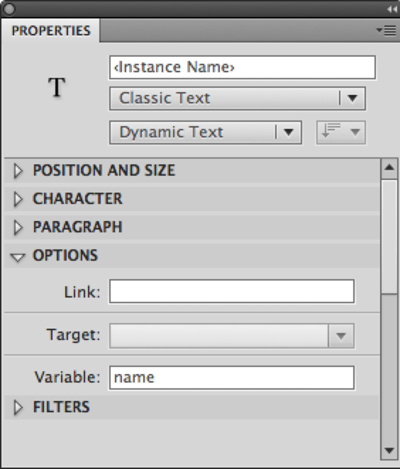
When using Input or Dynamic text, you'll see the Variable field pop up under the Options portion of the Properties panel.
Let's think about what we want to happen and what we have to work with before typing the code.
We have three elements;
1. An input text field where the user is going to type her/his name. We've defined this field as a variable—a container for data—called "name."
2. The dynamic text field, where the user will get a customized response, with a variable name of response.
3. The button that will trigger the response with an instance name of submit_btn.
We want the user to type their name and hit the submit button. Then we want Flash to return a message in the response field that uses the name the viewer typed.
Now it's time for the code.
Highlight frame 2 of the actions layer, then click inside the Actions pane and make sure it says ACTIONS-FRAME at the top left.
Type this code (I'll explain how it works in a second):
response="Hey there" + name + ". It's great to see you.";
Now test the movie again. Type your name in the input field and press the button.
Voila! A customized message.
Here's how the code works:
You first created a variable called name that stored the user's input (they could have typed "blue" or anything, actually).
You then created a text field called "response" that would be filled with whatever you wanted, based on the code within quotes in the ActionScript ("Hey there" and ". It's great to see you.")
Once the user pressed the button, Flash moved to frame two and stopped. The dynamic textbox took the user's name from the variable (name) in frame 1, and placed it between the two text bits you put between the quotes (+ name +).
Try changing that text to something ridiculous like "Hey" + name + ", here's your hat, what's your hurry?" and see what happens.
Add a new input field in the first frame with a new variable name. Ask the viewer to input their favorite day of the week. Then add a new dynamic text field on the second frame with a new instance name.
Add more code beneath what you already have in frame two of the actions layer that calls on the new dynamic text variable, and have fun responding to your user's favorite day of the week using the quotes to let Flash know it should display that text (called a String).
Whew! But now you know a bit more about what input text does, and how you can dynamically respond to user input.
Save this file to refer back to for another project.
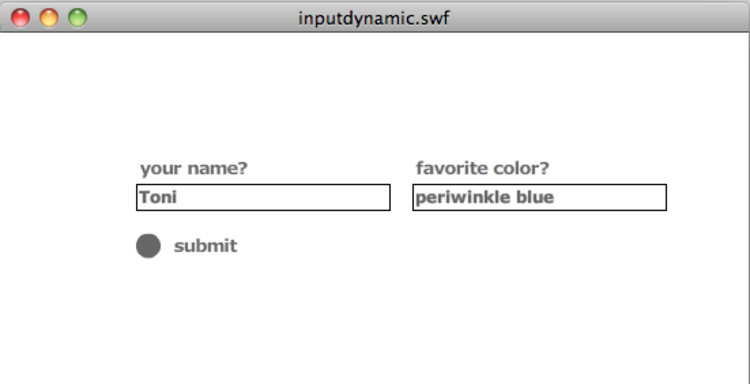
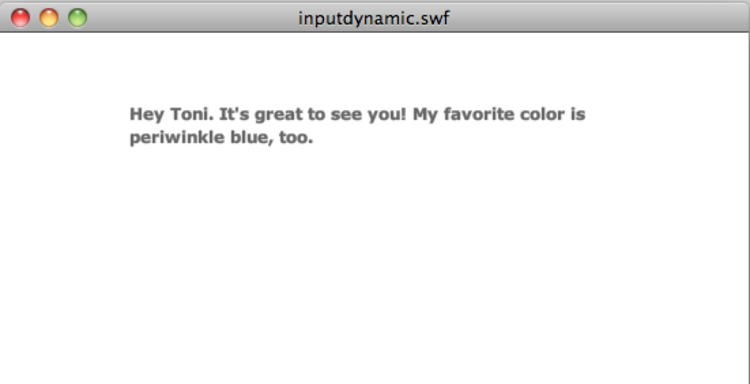
Add more input and dynamic text fields to make the experience more interactive. Think "mad-libs" even ;-)
LOADING EXTERNAL TEXT FILES
Now it's time to look at another function of Dynamic text; loading external text files on the fly. This is a great way to create pages that update anytime you want to add new or additional content (like a blog, for instance).
Here are the parts you need:
A dynamic text box with an instance name and a variable name, since it will contain data. Remember both so you can refer to them later.
A text file that has been saved in TXT format (not doc, or any other word processing document type).
Within the text file, the very first word needs to be the variable name you used for the dynamic textbox, plus an = sign (for example "content =" (no quotes)). That first word in the text file will be recognized by Flash as the variable you created, and it will use the text that follows it to fill the dynamic text box.
In the first frame of the FLA file (on a new layer called actions, of course) the code you need is a piece of cake:
loadVariables("nameoftextfile.txt", this);
Where "nameoftextfile.txt" is the actual name of your text file, in quotes. Remember to save your FLA in the same location as the text file before you test it. And that's it!
What if the text you want to load dynamically is longer than the size of the text field you've created? That's where scrollbars come in.
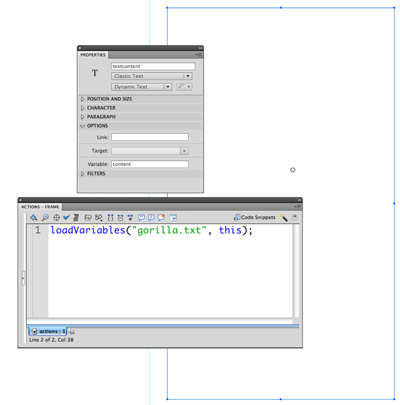
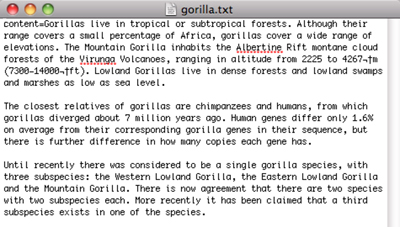
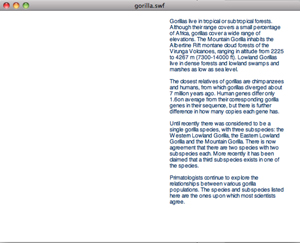
Set up a dynamic text field and variable name, then add the code in the first frame of the actions layer. In a TextEdit file, add the variable name and an = sign as the first words (no spaces). Flash will interpret that as the variable and use it to display the text in that text field.
embedded scrolling text
The order of the steps is important, so be watchful—Flash will get snarky if you don't do things precisely.
Open a new AS2 file.
Create a dynamic text field. Set it to multiline under the Paragraph Behavior option in the Properties panel. Set the other character and paragraph options to suit your design style. Remember, however, that funky fonts are hard to read at smaller sizes, so something more classic is a better choice. Also remember that if someone doesn't have that font on their machine, it will default to a standard serif or sans serif font.
Give the text field an instance name in the Properties panel.
Open the Components panel from the Window menu; then click on the triangle next to User Interface to access those components.
Scroll down and drag the UIScrollbar graphic to the inside right edge of your dynamic text box. It's important that the graphic scrollbar is placed overlapping the textbox so Flash knows what element it needs to be attached to.
While the scrollbar is selected, double-check the Properties panel to make sure it's associated with the text field instance name.
Open a text file that you might have on your computer, or generate some dummy text (see below), then select and copy the contents.
If you want to use placeholder (dummy) text. Go to http://www.lipsum.com/ and scroll down a bit to determine how many paragraphs you want to generate (4 is good for this exercise), and copy that.
Flip back to Flash and with the text tool selected, click inside the dynamic textbox and paste the text. Then deselect the textbox and test your movie.
Nice!
If you want to move the scrollbar now, you can. It's been assigned to the dynamic text field at this point, so select it with the Selection tool and use the arrow keys to nudge it to the right; this will add some needed "breathing room" to the right margin of the text field.
If you prefer not to move the scrollbar, use the Paragraph settings in the Properties panel to adjust the right margin to a small positive number.

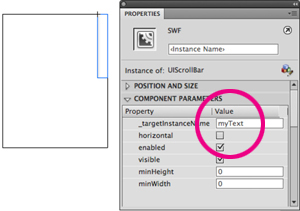
After adding the scrollbar component to the dynamic text field, make sure it's attached to the text field instance name in the Properties panel.
LOADING EXTERNAL SCROLLING TEXT
If you want to have more text than your dynamic text field can accommodate, you'll need to use a little extra code. It's not hard, and doing this exercise and saving it will be a handy reference later on.
First, get the text document prepared; remember that it has to be a TXT file, and that you want it to start with "content=" at the beginning of the text that's going to load. Save it to the folder where you will save your FLA file.
In Flash, create a new AS2 file. Save it now, as you won't be able to test it unless it's saved.
Remember to put it in the same folder where you saved the TXT file.
Create a dynamic textbox and set the font, size, color, and so on, to make it fit your design.
Give the text field an instance name in the Properties panel (I will be using story_txt for this exercise), and set the Paragraph Behavior to Multiline.
Open the Component panel from the Window menu and drag a UIScrollbar to the right side of your text field—remember that the scrollbar must be inside the text field in order for Flash to know where to attach it.
Name this layer "content" and lock it.
Add a new layer named "actions" and lock it, too.
Select the first frame in the actions layer.
Open the Actions pane and make sure it says ACTIONS-FRAME at the top left. Here is the code you need to add to the first frame in the actions layer:
var myStory:LoadVars = new LoadVars();
myStory.onLoad = onText;
myStory.load("mytext.txt");
function onText(success:Boolean) {
if (success) {
story_txt.text = myStory.content;
} else {
story_txt.text = "you messed up somewhere";
}
}
Save your file again, and test it!
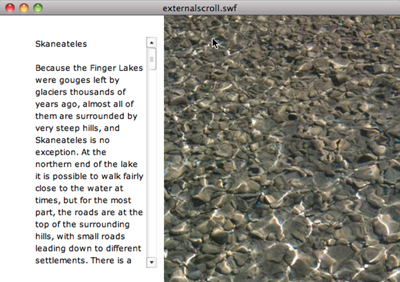
Here's how the code works:
You start by creating a new variable—remember, that's a container for information or data. You can name it anything you want, but be sure it isn't a word that Flash has reserved as an AS word. In that same line, you defined the variable as a new variable with content that will be loaded (as vs. one that exists already in the FLA).
The second line refers to the variable name, and indicates that once it loads, it will be text.
The third line tells Flash what TXT file to look for and load. Since that's a string, it's in quotes.
The next lines check to see if what you've told Flash to do is true or false (this is referred to as a Boolean, which only has 2 values, true or false). If it was able to find and load the text successfully, it will be assigned to the text field instance name as text, and will display the content after the the variable inside the TXT document (content=).
The "else" statement is a way to check whether Flash was successful or not. You can put anything you want between the quotes; it will display in the Output pane to let you know if there's a mistake in your code.
That's a lot of explanation, but it's important to understand how Flash thinks so, down the road, you are able to create your own code, or at the very least, what parts of a standard code like this are things you can change: the variable name (myStory), the TXT file name, the instance name of the dynamic text box (story_txt) and the "else" statement you want to display if there's a problem.
INPUT AND DYNAMIC TEXT USING AS3
DYNAMIC TEXT
Using the text tool to generate a message or content in a Flash ActionScript3 file is no different than it is when creating a project using ActionScript2. The Properties panel offers a wealth of text options—more than in previous versions of Flash, and definitely easier to access. You, no doubt, know your way around these options fairly well at this point.
Use the Properties panel to select Device Fonts from the Character Anti-alias popup menu.
The advantage to using device fonts is that it will make your Flash file, and the published SWF, substantially smaller than using embedded fonts. The downside is that you don't have a lot of control over how your text will ultimately be displayed in anyone's browser.
At the top portion of the Properties panel, when working with type, you can choose from static type, which is what you want to use to communicate your message, dynamic text, which is used to import text from an external txt file, and input text, which creates a text field in which viewers can type.
It does make a difference which option you select here as both input and sometimes dynamic text can be selectable; you don't want viewers messing with type you intended to be static (non-selectable). Input text and dynamic text are both displayed with a dotted line, even when they aren't selected, so you can quickly see if you've made an error there.
Dynamic Text is great option when you are designing a site that will either respond to input from a user, or when the content of the text field changes. Lots of clients like the option to change some portions of their site frequently, and they can do that without bothering you by simply uploading a new txt file with the same name as the original to update that text immediately. They would need to know how to FTP, and where to put the file, of course, but that shouldn't be a huge problem.
Start by preparing a text file in any text editor (NotePad is good, as is TextEdit for Mac). Make sure you save it as TXT and not DOC or WPD, or other format. Save it in a new folder/directory, and remember what you called it as you'll be referring to the file name in your code later on.
Open a new Flash ActionScript3 file and create the interface (background, images, graphics, etc.), then add a layer for the text field itself (lock the other layers first).
Select the Text tool and drag a rectangle where you'd like the text to appear. Make a note of the position of the X and Y positions and the dimensions, then delete the text field. We'll use ActionScript to create it a runtime.
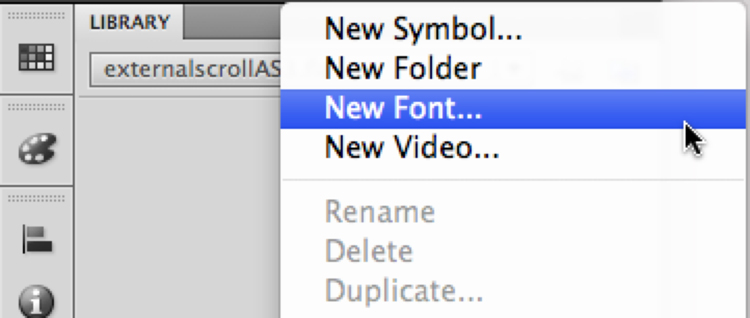
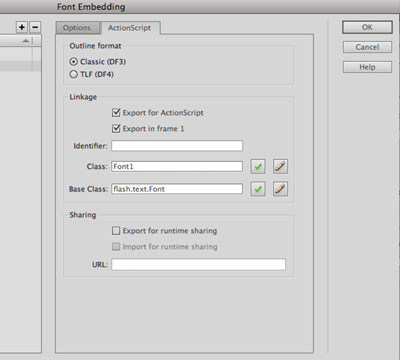
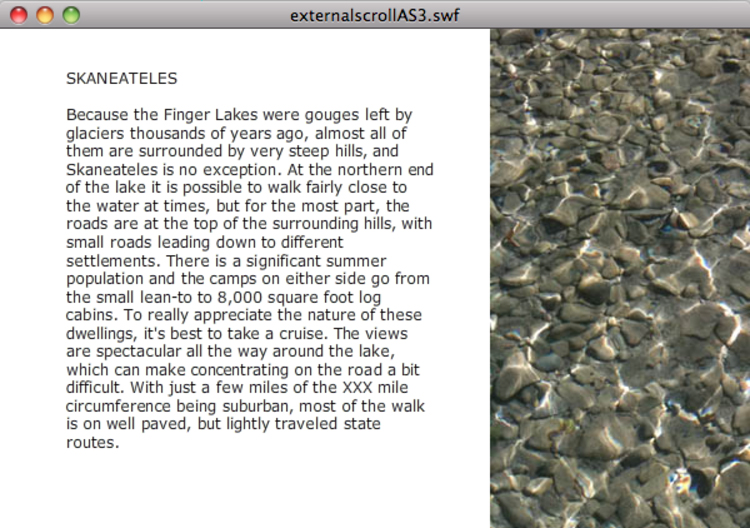
Using the New Font option controls which typeface will display in your dynamic text field.
Click on the Library submenu and choose New Font. Select the typeface and characters (upper, lower, punctuation, etc.) you want to use, then click the ActionScript tab. Check the Export for ActionScript option, then click OK. Flash will let you know that it's going to create a new class for you—click OK again.
Save the movie in the same folder where the TXT file is located.
Add a new layer for actions and in the first frame, type in the following code (note the added comments, as indicated by // You do not need them in your code, but it does explain which each line of code does, so read them!
var myFont = new Font1();
var myFormat:TextFormat = new TextFormat();
myFormat.size = 12;
myFormat.align = TextFormatAlign.LEFT;
myFormat.font = myFont.fontName;
//create a variable that will hold your text, and note that this is being strict typed as a TextField
var myText:TextField = new TextField();
myText.defaultTextFormat = myFormat;
myText.embedFonts = true;
myText.antiAliasType = AntiAliasType.ADVANCED;
//using addChild in ActionScript3 is similar to loadMovie in ActionScript2, for loading images and SWFs. "external_txt" is the file name of the txt file
addChild(myText);
//create a variable that locates your external text file
var textReq:URLRequest = new URLRequest("mytext2.txt");
//define a variable that loads the external text file
var textLoad:URLLoader = new URLLoader();
//create the action that connects the request and the loader
textLoad.load(textReq);
//create the function that will actually load the text
function textReady(event:Event):void {
myText.text = event.target.data;
}
//define the event listener so that Flash knows when to load the text
textLoad.addEventListener(Event.COMPLETE, textReady);
//define the size and position of the text field
myText.border = false;
myText.wordWrap = true;
myText.width = 300;
myText.height = 500;
myText.x = 50;
myText.y = 30;
Save your file to refer back to when needed.
Obviously, you can change the position and size of the textTxt field, add a border (set it to true), and establish what color you want to use by adding that to the textFormat variable:
myText.textColor = 0x5f5d51;
INPUT TEXT
You'd use input text when you wanted to respond in a personal way to someone's visit, or to gather data needed to process an order, or send email. Since adding a contact page to a site is good practice, we'll run through that using ActionScript3.
Start with a new Flash ActionScript3 file, and design the interface for a contact page on the first layer.
On a new layer, create three Input text fields, and set the text properties (font, size, color, etc.) for each one.
Select each field and add instance names using the Properties panel. For this example, we are using name_txt, email_txt, , and msg_txt.
Develop the graphics for a "send" button, and make it a button symbol with an instance name of submit_btn.
Finally, add a Dynamic text field that will display an error message if someone doesn't fill out the form properly. Name this instance status_txt in the Properties panel.
Add field titles as Static text, so that people know where to type what information.
Add a new layer for actions, and with the first frame selected, open the Actions pane to enter the following code:
stop();
import flash.events.*;
import flash.net.URLLoader;
import flash.net.URLLoaderDataFormat;
import flash.net.URLRequest;
var variables:URLVariables = new URLVariables();
// Be sure to change this URL to point to the PHP file on your server; if it's in a subfolder, remember to add the folder name before the file name
var varSend:URLRequest = new URLRequest("http://www.yoursite.com/email.php");
var varLoader:URLLoader = new URLLoader;
varSend.method = URLRequestMethod.POST;
varSend.data = variables;
status_txt.text = "";
submit_btn.addEventListener(MouseEvent.CLICK, ValidateAndSend);
function ValidateAndSend(event:MouseEvent):void{
//validate form fields
if(!name_txt.length) {
status_txt.text = "Please enter your name.";
} else if(!email_txt.length) {
status_txt.text = "Please enter an email address";
} else if(!validateEmail(email_txt.text)) {
status_txt.text = "Please enter a VALID email address";
} else if(!msg_txt.length) {
status_txt.text = "Please enter a message.";
} else {
status_txt.text = "Thanks " + name_txt.text + ", your message has been sent!";
variables.userName = name_txt.text;
variables.userEmail = email_txt.text;
variables.userMsg = msg_txt.text;
varLoader load(varSend);
gotoAndStop(2);
}
}
function validateEmail(str:String):Boolean {
var pattern:RegExp = /(\w|[_.\-])+@((\w|-)+\.)+\w{2,4}+/;
var result:Object = pattern.exec(str);
if(result == null) {
return false;
}
return true;
}
To let the user know the form has been sent, add a second keyframe to each layer and place this code on the actions layer using the Actions pane:
reply_txt.text = status_txt.text;
status_txt.text = "";
Delete all but the status_txt field on the second keyframe.
Select the status_txt field, and change the instance name to reply_txt. This is where the message, generated by the ActionScript in frame 2, will appear.
Publish and save your file. (You have been testing it all along, right?)
Now for the PHP piece, which is what makes this work once it's online.
Launch Dreamweaver. This will be a code-only file, so you don't need to worry about what it will look like—the HTML and SWF that Flash publishes will take care of that.

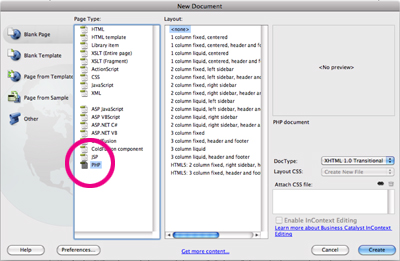
Create a PHP file in Dreamweaver to drive the email code in the Flash piece.
Create a new blank PHP file from the New dialog box (Command N / Ctrl N).
Here's the PHP code needed to send the email; Delete all the code that may be in the code area and type this in the code panel of Dreamweaver instead, NOT the design panel!
NOTE: make sure you change the URL in this code to reflect your own email address!
<?php
$senderName = $_POST['userName'];
$senderEmail = $
POST['userEmail'];
$senderMessage = $_POST['userMsg'];
$senderName =
stripslashes($senderName);
$senderEmail = stripslashes($senderEmail);
$senderMessage = stripslashes($senderMessage);
//change the following to your own email address or it won't work!
$to = "name@someplace.com";
$from = "$senderEmail ";
//change the subject here if you want
$subject = "Contact from your site";
$message = <<<EOF
<html>
<body bgcolor="#FFFFFF">
<b>Name</b> = $senderName<br /><br />
<b>Email</b> = <a href="mailto:$senderEmail">$senderEmail</a><br /><br />
<b>Message</b> = $senderMessage<br />
</body>
</html>
EOF;
//end of message
$headers = "From: $from\r\n";
$headers .= "Content-type: text/html\r\n";
$to = "$to";
mail($to, $subject, $message, $headers);
exit();
?>
Save this file as email.php in the same folder with the Flash file—make sure Dreamweaver adds the correct PHP extention to the file name.
When you have everything together in the same folder, connect to your domain server (whether through an FTP program like SmartFTP, or Fetch, or using Dreamweaver). Create a new folder on the server called "email" and put everything except the FLA file into that new folder.
To test this, type http://yourdomainname.com/email/nameofhtmlfile.html in a new browser window. You should see your form. Fill it out and submit it. You should be taken to the "thank you" page.
Wait a few minutes and check your email.
Not too shabby!
TYPOGRAPHY ON THE WEB
Selecting fonts for use on the web is first of all a design decision; does the "voice" of the typeface match the "personality" of the site topic? It would be inappropriate to use Warehouse, for instance, on a site for a spa, but a more flowing and feminine font like Zapfino might be perfect.
Of course, unusual fonts are best left to headlines and subheads, and shouldn't be used for any lengthy sections of body copy. For that, you want to look at more classically designed font options, like serif fonts: Bembo, Palatino, Times New Roman; and sans serif fonts like Arial, Helvetica and Verdana. Many people believe that sans serif fonts are easier to read on a monitor. The size, color and contrast, tracking, and leading are all factors in good internet-based typography.
The nice thing about Flash is that, if file size can be managed appropriately, you can use any font(s) you want; you can embed them (for dynamic or input text), or Flash automatically embeds them (for static text) when you publish your SWF file.
For some excellent advice on using type on the web, check out these resources:
http://www.webtypography.net/toc/
http://webstyleguide.com/type/index.html
http://ilovetypography.com/2008/02/28/a-guide-to-web-typography/