SITE MANAGEMENT
FILE STRUCTURE
Setting up the file structure for developing a site is one of the most important organizational steps besides developing the strategy and goals.
A good site structure consists of a root folder, where all the work you create or collect for the site resides. Within that root folder, you need to have an index.html file. Whatever the content might be, this file must remain "loose" in the root folder. This file is your first, or "home" page.
If you will be covering several different topics in the site, the next step would be to create a folder for each topic. For this class, you might want to create a folder for each week, or create a new folder for each assignment/project. Save everything you do for that week or project in that folder from now on. Don't save it somewhere else (i.e. your Documents folder, or somewhere on your C drive (PC)) and then move or copy the files from there.
Inside each main topic/project folder, you will end up with at least one HTML file and more than likely multiple other files—docx, psd, ai, fla, swf, jpg, gif, ping, and so on. You may want to create a sub-folder for these pieces, although if you are developing your site entirely in Flash, I recommend just leaving the FLA, SWF, and HTML files "loose" in the main topic/project folder.
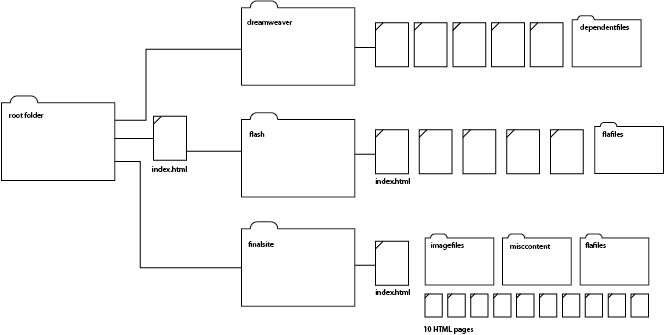


The root folder on your computer (the desktop is a good place for it, or give it a name that includes a ~ before it, so it appears at the top of the list view in another folder) will look something like the image at the far left: main topic folders and HTML, FLA, and SWF files "loose" with subfolders for other elements.
In Dreamweaver, the local site view (near left) will reflect the same structure:
Yellow = the root folder
Green = topic folders
Red = the first page, or index.html file.
One of the great things about Dreamweaver is that it will track the location of files, so if you should move them around in the Files panel in Dreamweaver, it will update all the links. In this case, "links" refers to the relationship between any assets (images, and/or media) used in the HTML file(s) you're moving.. If you move images or media, Dreamweaver will likewise update the HTML files that use them.
But! If you do this on your desktop, rather than in the Files panel in Dreamweaver, then any and all links will break and you'll end up with a bunch of gray broken link icon boxes. At the point, you have no choice but to relocate all the images/media and re-insert them into the HTML files. Not fun.
The other key piece to a well-organized site is the concept I refer to as a "parallel universe" between the local site structure and the remote site structure. While there are many file types that do not belong on your remote server, those that do need to be in the same location as they are in your local, root folder.
If you have a folder called "page1" that contains a page1.html file, and a subfolder with images for that page in your local root folder, then you must have a "page1" folder containing the HTML file and subfolder of images.

Note that there are some files on the right/local side that were not copied over to the remote side; this is because there are many files you may develop that are "originals." Those remain local, while their optimized versions - those actually used in an HTML file - do need to be moved to the remote side. FLA file, for instance, never belong on the remote server, nor to PSD files. See the section on cloaking for how to manage that.
UPLOADING YOUR SITE
Finally, get all your pages online!
Before you go further, open Manage Sites from the Site menu. Click on "cloaking" to access that panel, if you haven't already done so.
Check the "enable cloaking" box, and the "cloak files ending with" box.
In the field below, type: .fla .psd .eps .tif .tiff .doc .innd so none of these "originals" will be uploaded to the server. You don't need them for your site to work, and they'll just take up precious space on the server.
Click OK, and then Done to exit the Site Management dialog box.
In the Files panel, click on the plug icon to connect to the remote server
Now, to upload your site files:
Make sure that your site is the current site named in the Files pane, and click on the connect to server icon.
You should see a folder at the top left—depending on how your server is set up, it may have a name, or merely a slash ( / ). You may also see some other files—perhaps something you uploaded previously.
If there are old files in your remote folder, and they are they're something you don't need, select them in the remote site list and press the delete key, or control-click/right click, choose Edit, then Delete. If you want to back them up, just in case, select them and press the down arrow in the Files panel ("get files"). They will be moved to the current root folder, so you may end up with a big mess. Be careful!
Click on the index.html file from the local site and drag it on top of the root folder in the remote site—make sure you position it exactly over the folder, and see a green circle with a + symbol in it.
Dreamweaver will ask if you want to include all dependent files. I usually click yes. Dreamweaver then uses the transfer protocol you chose when defining the site to move the index.html file to the server, and also moves any folders and files used on that page. That means, if there's a nav bar from Fireworks on the page, Dreamweaver moves the folder with all the slices associated with it to the server as well.

Drag the files and folders you need from the local side to the remote side of the Files panel. Make sure you drop them on top of the root folder on the remote side; make sure you see the green + sign before letting go.
If you select No, you'll have to move folders and other associated files by clicking and dragging them to the server manually. This isn't a bad thing to do, either. But you do need to know what you're doing or things can get pretty messy. It's a matter of preference.
You can also move files/folders by selecting them and using the Put arrow (the blue one).
Once you've moved the index.html file over, open a web browser and type in your URL. See if it works!
If there are missing image icons and broken links, fix them in Dreamweaver, and upload the edited files again.
Rather than dragging files from one side to the other, you could select the file(s) you want to move, then use either the GET or PUT arrow to move them back and forth.
I've found the biggest issue is that all the parts of a nav bar don't always show. I just upload the folder where all the slices for the nav bar are located, hit the refresh file list button, and try again.
Don't despair if you find you still have some work to do to make your site fully functional. It's just the way of the web world and even the most professional and experienced webmasters have been known to scratch their heads, wondering why things don't work.
It's a good idea to leave yourself at least 2 weeks for uploading, correcting, and re-uploading files.
When it's all together and functioning perfectly, pat yourself on the back!