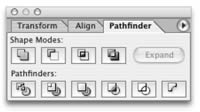
PATHFINDEROpen this palette from the Window menu.
|
|
Unite You need to choose two objects that are touching
or overlapping to get the full benefit of this.
|
|
SubtractThis takes away any portion of the back object that was covered by the front object. It also takes away the front object. Remember to copy the front object so you can paste it back later.
|
|
Intersect This evaluates the two objects and leaves you with the area that was common to both.
|
|
Exclude This leaves you with those parts of your objects which had nothing in common, with empty space in the middle. The resulting shape is actually a compound path until it's expanded.
|
|
Divide This creates a lot of parts, that all have the same fill color as they did before. Any parts that overlapped are now separate entities.
|
|
Trim This is similar to divide, except shapes (the heart, in this case) that haven't been interrupted by another object, remain whole.
|
|
OutlineAs with Divide, this separates your two elements into many, but they adopt the fill color as their stroke, and loose their fill color. Minus BackThis uses the back shape as a guide and deletes any duplicate information from the front.
|
|
Under the Effects menu is another set of Pathfinder options. Two of the most handy are “hard mix” and “soft mix.” To make these work, select several objects and group them (command G) first. Mix SoftHere, you have to decide how "transparent" the front object is. Depending on the "rate" you type in, the color of the object in back shows through. Quite lovely. Group your objects before using this.
|
|
Mix Hard This makes the intersecting area a combination of the two colors which overlap. So, if one element is magenta, and the other was cyan, the intersection would be purple. The elements you want to mix need to be grouped first (command G).
|
|
 |
|||||||||||||||||||||||
 |
|||||||||||||||||||||||
 |
|||||||||||||||||||||||
 |
|||||||||||||||||||||||
 |
 |
 |
|||||||||||||||||||||