|
||||||||||||||||||||||||
 |
||||||||||||||||||||||||
 |
||||||||||||||||||||||||
 |
||||||||||||||||||||||||
 |
 |
|||||||||||||||||||||||
|
|||||||||||||||||||||||||||||||||||||||||||||||||||||||||||||||||||||||||||||||||||||||||||||||||||||||||||||||||||||||||||||||||||||||||||||||||||||||||||||||||||||
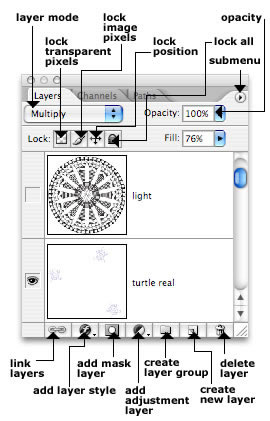
LAYERSThe Layers palette in Photoshop is fairly straightforward and allows you to separate different elements within an image so they can be modified or eliminated without affecting work on other layers. By default, every new document has a Background layer that's locked. To unlock it, double click on its name and rename it (or leave it to the default name - Layer 0). Add layers by either choosing New Layer from the submenu, clicking the "create new layer" icon at the bottom of the palette, or using the keystroke shortcut Command Option Shift N/ Ctrl Alt Shift N, which will place the new layer above the one that is currently highlighted. Rearrange layers by dragging them up or down in the palette. You can also move a selected layer up with Command/Ctrl ], or down with Command/Ctrl [. Hide and show layers to isolate visual information by clicking the eyeball icon to the left of a layer. Option/Alt click an eyeball to hide all but the selected layer: Option/Alt click again to show all the layers that were originally visible. Duplicate a layer by dragging it to the "create new layer" icon at the bottom of the palette, or choosing Duplicate Layer from the submenu. Layer modes are a powerful feature. Multiply mode is a hands-down favorite, since it allows layers underneath to show through. This is handy for includingline work that’s been scanned in as well as for creating subtle textures and color shifts. The lock options at the top of the Layers palette were new with Photoshop CS. Locking transparent pixels protects clear areas from being painted. You can still paint areas that already have colors applied. Locking image pixels essentially locks the content of a layer, whether it includes color or not. ocking the position of a layer prohibits you from moving its contents, although the content can still be edited. Lock All prevents altering the layer content in any way. You can still move the layer up or down in the palette when it’s locked, however. The bottom of the palette contains the options to link selected layers: Shift or Option/Alt click to select the layers you want to link, then click this icon. The benefit to this is that moving anything on one linked layer also moves the content on the other layers linked to it. Layer styles are ways to add special effects to the content on a layer. The possibilities are endless if you select Blending Options from the pop-up list. Click on the box to add a style, and then click on the name of the style to access the options for that style. You can apply any number of effects to a single layer. Save your style by clicking the New Style button. Double clicking the style icon next to the layer will reopen the Layer Styles dialog box so you can modify the properties, or add to, or eliminate them.
|
|
|
|
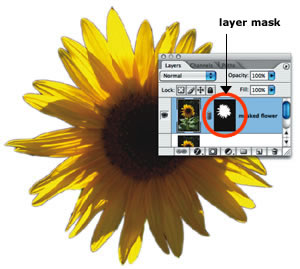
Layer masks can either be created with selections or by creating a vector path. They work by blocking out, or revealing, portions of the layer’s content. When a mask is applied to a layer, visual content on lower layers shows wherever content affected by the mask is hidden. It’s a great way to silhouette an image without destroying the original. Layer masks can also be used to create artwork "from scratch." Fill a layer with color, then create the shape using a mask. In order to make the "add layer mask" icon functional, you must be on a layer other than the default Background layer - either create a duplicate layer, or rename the Background layer. If nothing is selected, you will get a blank layer mask. If you have dancing ants active, the default action is to show the area within the selection and hide everything outside it. Edit a layer mask by Option/Alt clicking the mask icon in the Layer’s palette. If you click the link icon between the layer content and its mask, you can move the mask around. Click between them again to relink (thus lock) the mask and layer.
|
Layer masks reveal the portion of an image that's white in the mask. Edit a mask by selecting it in the layers palette, or option/alt clicking the mask.
|
|
|
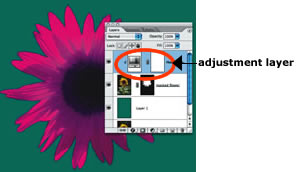
Adjustment layers are used to apply adjustments you’d find using Image -> Adjustments, but again, because they’re applied to layers, the original image is not destroyed. Deleting the Adjustment layer restores the image to its original state. Since an Adjustment layer affects all the layers beneath it, you might need to link it to just the layer(s) you want it to influence. Hold the Option/Alt key and move it between the Adjustment layer and the one beneath it. When you get the link icon, click to link the layers. Layer groups are a great way to organize layers - especially if you use lots of them! Click the folder icon to create a group, then just drag the layers you want to include on top of the folder’s layer. The black outline around that layer indicates you’re dropping the layers into the group. You can Shift click to select several layers in a row, or Option/Alt click to select layers that are out of sequence. New layers are always added above the currently selected layer, unless you hold the Command/Ctrl key when you click the "create new layer" icon in the Layers palette. Holding the Command/Ctrl key will place the new layer below the currently highlighted layer. You can select a layer and then click the "trash" icon to delete it. This method results in a dialog box asking if you’re sure you want to do that. Or, you can simply drag the layer to the trash to delete it without the warning.
|
 |
|
|
If file size is not an issue, I recommend saving all your layers, even if they will not ulitimately be seen in the final image - just hide them and they won't be visible. This provide flexibility when editing an image later on.
|
||