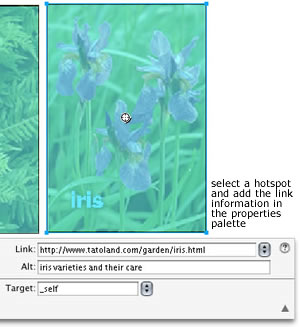
HOTSPOTS & IMAGE MAPSA hotspot is traditionally used to create a link from one page in a site to another. By default they’re a transparent blue, which you can see by clicking on the “view slices and hotspots” icon in the tool palette. I’ve discovered that you can use hotspots to create rollovers and disjoint rollovers as well—a cool trick since hotpots and slices should never overlap others of their own kind, meaning you can overlap a hotspot and a slice. You can put a hotspot over any image or text.
|
|
||||
An image map is an image that has hotspots in several areas. When someone moves the cursor over a hotspot, the arrow turns into a hand icon, indicating that clicking that area will link them to another part of the site. The most obvious examples of an image map is a map of the U.S. with hotspots drawn around each state. Clicking on a state might then take you to a page in the site that describes that state’s per capita income, population, or universities.
|
|||||
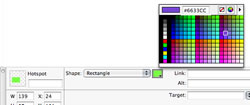
Creating an image map is very simple. Import or create the base image that you want to use. Use the hotspot tools to create hotspots over the areas that you want to use as links to other pages in your site. Hotspots can be any size or shape. Click on each hotspot individually, name it in the properties panel, and then assign a link (url) to it in the url field. FYI: you can change the default color of hotspots and links by selecting them and using the color box in the properties panel. All your hotspots will appear on the web layer. If you've made a mistake with your link information, you can either edit the png file and export it again, or correct it right within Dreamweaver. |
change the color of your hotspots in the Properties panel
|
||||
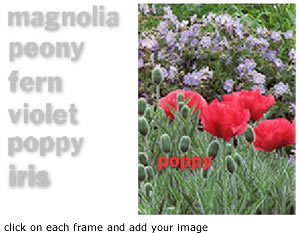
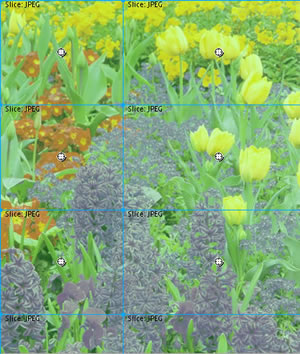
SLICESSlices can also be used as links—if you recall, buttons and pop-up menus are triggered by slices. Slices also act in a different way: they literally slice an image into pieces that are loaded individually and simultaneously into the browser window. This makes loading a large image much, much faster, and you’re less likely to loose your audience from boredom. The garden image above would take approximately 15 seconds to load in a browser with a connection speed of 56.6 bpm (bits per minute). In a very unscientific test, I put a sliced up version of the garden and an unsliced version on a web page and loaded it into a browser. The sliced version loaded almost twice as fast. It’s unlikely, however, that you’ll need to worry about loading huge images that don’t otherwise have slices or hotspots assigned to various objects. Most of the time, you’ll have buttons, pop-up menus, and disjoint rollovers in your files that already include slices (or hotspots). Fireworks will simply create a table based on those slices when you export the file, in essence creating “invisible” slices where there are none. It’s important to understand that what gets exported from Fireworks is a table, however. Slices are most valuable for creating disjoint rollovers.
|
 |
||||
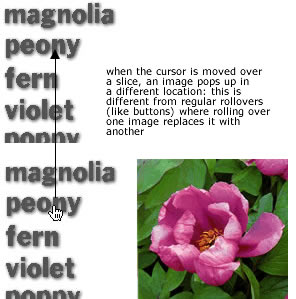
DISJOINT ROLLOVERSA disjoint rollover is when the viewer moves the cursor over an image or some text, and another image or text pops up in a different location. You need to create a new frame for each image you want to pop up. Frames are different than layers: layers contain artwork and text. Frames are individual “moments in time” and only frame 1 will show unless you create a trigger to show frame 2 or 3 and so on. So even though, in this series of illustrations, all the flower photos actually reside on layer 1, they will only be visible when something triggers frame 2 or 3 to pop up. It’s weird, but it works! Here’s how:
|
|
||||
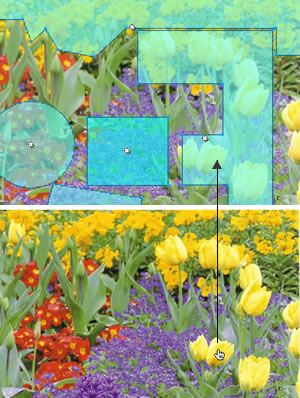
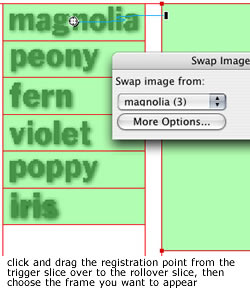
On your main canvas, create the text and/or image(s) you want to trigger the rollover event. Add slices to each one: you can draw them by hand, or select all the images/text and use Edit > insert > slices. Using this method will bring up a dialog box that asks whether you want one or multiple slices. If you have more than one object selected and you want individual slices for each one, choose “multiple.” Click on each slice and name it in the properties panel.
|
|
||||
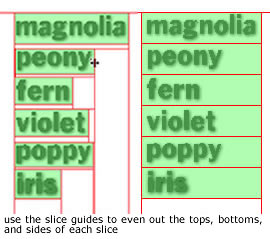
Chances are you’ll get slices that are of different sizes. This is not a bad thing, but it’s not the most efficient way to slice something up. Because slices get transferred into a table, you really want to keep your slices aligned in as many directions as possible. When you move your cursor over a red slice guide it changes into a “move guide” icon. Adjust the sizes of your slices so that all the slice guides match up. Now you’re ready to add the images that will pop up when each slice is rolled over. |
|
||||
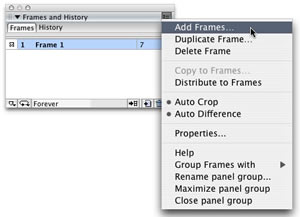
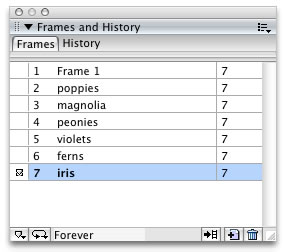
Choose “add frames” from the frames options menu (at the top right of the panel). Add as many frames as you need to add your images—for a total of one more that the actual number of images, since frame 1 is already in use. You can double click on each frame in the list to give it a unique name. If you’re using more than three frames, I highly recommend naming them or you’ll make yourself crazy trying to keep them straight. |
|
||||
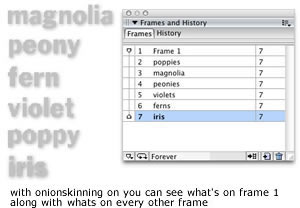
Click on the last frame you added, and turn on onion skinning, using the pop-up menu at the bottom left of the panel, or by clicking the left column on the last or first frame. At this point, you should be able to see what’s on frame 1.
|
|||||
Now, just click on each frame and add the appropriate image(s). |
|
||||
Create one slice that’s large enough to cover all the images you placed; remember that slices go on the web layer, which is common to all layers and frames. Now it’s time to create the disjoint rollover links. Click back to frame 1 and turn off onion skinning. If you’ve hidden your slices, click on the “show slices and hotspots” icon in the tool palette.
|
|
||||
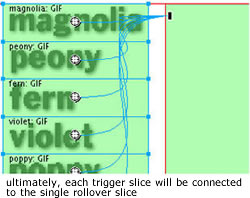
Once you finished, if you select all your trigger slices, you’ll see wavy blue lines coming from each one leading to the single slice you created to show your image. Test your rollover using either the preview button at the top of your document window, or in a browser window with F12. But wait, there’s more! |
|
||||
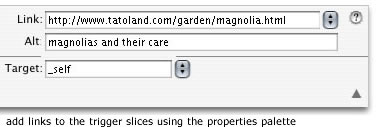
Slices can also be links, remember? In this model, you’ve created slices that trigger a behavior by being rolled over (“onMouseOver”). You can add another behavior to the trigger slices that responds to being clicked. Typically, the “onClick” behavior will send the viewer to anew page in the site. Select one of your trigger slices, and use the properties panel to add a url and an alt tag. Your trigger slice will turn blue (a hotspot), but will retain it’s “onMouseOver” behavior.
Test it again! |
|||||
|
|
||||